Recent Posts

Wednesday, December 21, 2011

Dinner for One: Lobster Salad Sandwich

I was on my own for dinner last night so while I was searching the grocery store for items for a quick supper I came across a cooked lobster on special for $10. I didn't have to search any further. Using items I already had at home I whipped up this simple yet delicious open-faced lobster sandwich.

Lobster Sandwich for One
  • 1 small cooked lobster, meat removed (or about 1 cup of lobster meat), chopped into small pieces
  • 1 Tbsp. Hellman's Half the Fat mayonnaise
  • squeeze of lemon juice
  • dash of Frank's hot sauce
  • sprinkling of chopped chives
  • 2 slices sourdough bread
  • 1/2 avocado, mashed
  • 1 tomato, sliced
  • salt and pepper to taste
  1. In a small mixing bowl combine the lobster meat with the mayonnaise, lemon juice, hot sauce and chives. Season with salt and pepper and set aside.
  2. Toast the bread and lay on a plate. Spread the avocado on each slice of bread and top with a few tomato slices, season with salt and pepper.
  3. Top the bread with the lobster salad and enjoy!!!

    Monday, December 19, 2011

    Panko Crusted Rack of Lamb with Rosemary and Orange

    A few months ago I made a delicious rack of lamb from Thomas Keller's Ad Hoc at Home cookbook. It was one of the best lamb dishes I have ever had with the most perfect crust. Tonight, I prepared lamb using the same coating process as the recipe in the book but changed up the flavourings. I served the lamb with a simple arugula salad with avocado and oranges to compliment the orange zest in the lamb.

    Panko Crusted Rack of Lamb with Rosemary and Orange
    Serves 4
    •  3 Tbsp. unsalted butter, softened
    • 2 Tbsp. Dijon mustard
    • 1 Tbsp. honey
    • 2 cloves of garlic, minced
    • 1 Tbsp. orange zest
    • 1 tsp. chopped fresh rosemary
    • 1 rack of lamb, frenched (make sure the rack has at least 8 bones)
    • vegetable oil for searing
    • 3/4 cup panko bread crumbs
    • kosher salt and freshly ground pepper to taste
    1. Preheat the oven to 425 degrees F.
    2. In a small mixing bowl, combine the butter with 1 Tbsp. of the Dijon, the honey, garlic, orange zest and rosemary. Stir until well combined. Season with salt and pepper and set aside.
    3. Season the rack of lamb with salt and pepper on both sides. Heat a large Saute pan over high heat. Once hot, coat the bottom of the pan with vegetable oil and sear the rack, fat side down first, until brown and crisp, about 2 minutes per side. Remove the rack from the pan, and place, fat side up, on a roasting rack in a roasting pan, or on top of a cooling rack placed on top of a sheet pan. Let cool.
    4. While the lamb is cooling, gently fold the panko bread crumbs into the butter mixture until just combined. Once the lamb is cool enough to handle, brush the remaining Dijon on the fat side of the rack, then press the butter mixture onto the rack until nicely coated.
    5. Place the lamb in the oven and roast until a meat thermometer reads 150 degrees F for medium-rare. About 20-25 minutes. Remove the lamb from the oven and let rest for 10 minutes before slicing in between the bones. 
    *if the crust falls off when slicing (it sometimes happens) simply sprinkle the crumbs ontop of the lamb when serving. It will still be delicious!!!!


    Thursday, December 8, 2011

    Chipotle and Honey Glazed Steak with Warm Corn Salad

    This Tex-Mex style dish is spicy but sweet and hearty but light. It is the perfect combination of flavours, is super quick and perfect for a weeknight. The flavours and spice will warm up any cold winter evening but you can also serve the dish at room temperature for lunch or for a light summer meal. I used ribeye cap for the steak because that is what I had on hand but this recipe will work with pretty much any cut of beef you have on hand. flank or flat iron steak will work great as well. Both recipes are adapted from The Mesa Grill Cookbook by Bobby Flay.

    Chipotle and Honey Glazed Steak
    Serves 4
    • 1.5 lb. ribeye cap, flank or flat iron steak
    • 1/2 cup honey
    • 1 Tbsp. chipotle puree (if you can't find chipotle puree, make your own by pureeing a can of chipotle in adobo in a food processor, the puree will keep in an air tight container in the refrigerator for up to a month)
    • 1 Tbsp. Dijon mustard
    • 1 Tbsp. vegetable oil
    • 1 clove of garlic, minced
    • kosher salt and freshly ground pepper to taste
    • vegetable oil for searing
    1.  Preheat the oven to 425 degrees F.
    2. Remove the steak from the fridge and allow to come to room temperature before searing.
    3. Meanwhile, prepare the glaze by combining the honey, chipotle, Dijon, vegetable oil and garlic in a small bowl until combined. Season with salt and pepper to taste.
    4. Liberally season the steak with salt and pepper.
    5. Heat a large skillet over high heat. Once hot, add enough vegetable oil to coat the bottom of the pan. Sear the steak until brown, about 2 minutes per side. Brush the top of the steak with some of the glaze and place in the oven. 
    6. Cook until steak is cooked through (about 10-20 minutes depending on the cut of steak), basting with some more glaze halfway through cooking. 
    7. Remove the steak from oven, brush with some more of the glaze and let rest for 10 minutes. Thinly slice the steak and serve atop of the corn salad.
    Warm Corn Salad
    Serves 4
    • 1 tsp. vegetable oil 
    • 1 tsp. butter
    • 1/2 red onion, chopped
    • 2 cloves of garlic, minced
    •  2 tsp. ancho chili powder (can be found at most grocery stores)
    • 1 red or poblano pepper, halved and seeds removed
    • 4 ears of corn, kernels remove
    • 1 lime, juiced and zested
    • chopped cilantro (optional)
    1. Preheat your ovens broiler. Place the pepper halves, skin side up on a baking sheet and place in the oven. Roast until the skin is black and charred then place in a bowl and cover with saran. Let sit for 10-15 minutes. Once cool enough to handle, remove saran wrap and peel away the black skin from the pepper. Chop and set aside.
    2. Heat a small saute pan over medium heat. Add the oil, onion and garlic and saute until softened.
    3. Stir in the chili powder and cook until fragrant, about 30 seconds then add the corn, stir to coat. Continue to saute until the corn cooked through. Stir in the roasted pepper, lime juice and lime zest.
    4. Transfer to a platter and top with cilantro if you wish then serve with the sliced steak.


      Wednesday, November 30, 2011

      Skillet Spanish Chicken

      I am always sourcing the internet, magazines, cook books, etc for recipe inspiration. A while back I bookmarked the recipe here with plans to make it eventually. Well last night was the night. I am never one to follow a recipe exactly so I changed it up a bit. It turned out delicious and was super easy for a weeknight meal. The best part? I only used one pan! I served it up with some Spanish rice and it was a perfect hearty meal for a cold and rainy night like yesterday.

      Spanish Skillet Chicken
      Serves 2-4
      •  4 skin on, bone in chicken thighs
      • 2 Tbsp. olive oil
      • 1 tsp. chopped fresh thyme
      • 1/4 tsp. sweet paprika
      • 1/4 tsp. smoked paprika
      • pinch of cayenne pepper
      • 1/4 cup Sherry
      • 1 small can cherry tomatoes, excess liquid drained (you can also use 1 pint of fresh cherry tomatoes, but I like the saucy consistency the canned ones add to the dish)
      • 1 roasted sweet bell pepper, sliced (I roasted mine myself but to save time you can use jarred)
      • 1 roasted piquillo pepper, sliced (same as above)
      • 1/2 large sweet onion, sliced
      • 1/4 lb. cured chorizo sausage, sliced
      • 5 cloves of garlic,  roughly chopped
      • small handful parsley, chopped
      • kosher salt to taste
      1. Preheat the oven to 450 degrees F.
      2. In a mixing bowl combine the chicken with the 1 Tbsp. of the olive oil, thyme, both paprika, cayenne pepper and a pinch of salt. Toss until the chicken is coated.
      3. Heat a medium sized skillet over high heat. Once hot add the remaining olive oil. Sear each piece of chicken until the skin is crispy, about two minutes per side. Remove the chicken to a plate, keeping the skillet on the heat.
      4. Lower the heat to low and pour in the sherry, using a wooden spoon scrape up any brown bits from the bottom of the pan and then let the sherry reduce by half. Once reduced take the pan of the heat.
      5. Add the tomatoes, peppers, onion, chorizo, garlic and a sprinkling of salt to the pan lightly stir to combine and then place the chicken pieces on top. Place the skillet into the oven and roast until chicken is cooked through, about 30 minutes.
      6. Carefully remove from the oven, sprinkle with the parsley and serve with Spanish rice. 

        Tuesday, November 29, 2011

        Monkeying Around

        Check out these cupcakes I made for my nephews 1st birthday this past weekend!

        I got the idea from here but altered it a little bit. I used half of a vanilla wafer for each of the ears instead of a whole one and instead of piping on the face and eyes with icing I used a black food marker.

        How cute are they? (sorry it is not the best pic, I took it with my phone)

        Saturday, November 26, 2011

        Weeknight Thanksgiving Feast!

        I may be Canadian but this past week every time I turned on the television someone was talking about or making Thanksgiving dinner. The thoughts of turkey and stuffing were filling my head so the other night I caved and made a full out thanksgiving dinner just for Jordan and I!!! You must think I am crazy but it was actually a lot easier than you think. I obviously didn't go and make a 30 lb. turkey but instead bought just a turkey breast. I used some stale hamburger buns to make the stuffing, made a quick pan gravy, microwaved some frozen peas and mashed up some taters and in just over an hour Jordan and I were eating like we were American!!!!

        Butter Basted Turkey Breast
        Serves 2
        • 1 boneless, skin-on turkey breast
        • 1/4 cup butter, softened
        • 1 Tbsp. parsley, chopped
        • 1 clove of garlic, minced
        • salt and pepper to taste
        1. Preheat the oven to 400 degrees F. 
        2. Place the turkey breast on a cooling rack placed on top of a baking sheet.
        3. In a small bowl combine the butter with the parsley, garlic, salt and pepper.
        4. Using your hands spread the butter all over the turkey breast, including under the skin.
        5. Place the turkey in the oven and roast until cooked through (internal temperature should be 165 degrees C), about 30-40 minutes. 
        6. Remove from oven and let rest before slicing.


          Skillet Stuffing
          Serves 2-4
          •  1 Tbsp. vegetable or olive oil
          • 1/2 Spanish onion, chopped
          • 2 ribs of celery, chopped
          • 1 clove of garlic, chopped
          • 2 tsp. mixed herbs, chopped (you can use whatever you have on hand, parsley, thyme, rosemary)
          • salt and pepper to taste
          • 4 cups stale bread, cubed
          • 1 cup chicken stock (or more if necessary)
          1. Once the turkey is in the oven, start preparing the stuffing.
          2. Heat a skillet over medium-high heat. Once hot add the oil and the onions. Saute until softened and starting to brown then add the celery and garlic, continue to cook until celery is starting to soften, about 5 minutes then stir in the bread cubes.
          3. Stir in the herbs and season with salt and pepper. 
          4. Pour over the stock until the bread is just wet, stirring to combine. Place the skillet in the oven and let bake along with the turkey. Remove when the turkey is done, the stuffing should be nice and crispy on the outside but still soft on the inside.


          Quick Pan Gravy
          • 1 Tbsp. butter
          • 1 Tbsp. flour
          • 2-3 cups chicken stock
          • 1 tsp. Worcestershire sauce
          • drippings from turkey
          • salt and pepper to taste
          1. Heat a small saucepan over medium heat. Add the butter and let melt. Once melted stir in the flour to form a roux (a paste).
          2. Cook the roux while stirring for one minute then whisk in 2 cups of the stock. Bring to a boil and let thicken then stir in the Worcestershire sauce. Take off the heat until the turkey is done cooking.
          3. Once the turkey is done and resting, place the gravy over low heat and stir in the turkey drippings. Adjust the consistency with some more stock if necessary then season with salt and pepper to taste.
          4. Serve with the rest of your meal.


            Wednesday, October 19, 2011

            Eat to the Beat 2011

            Last night I participated in Eat to the Beat a wonderful annual fundraising gala that gathers female chefs from around the city to support Willow Breast Cancer Support Canada. Check out some more info here.

            This was my third year participating in this event. Each participating chef prepares a bite size hors d'oeuvre for guests to enjoy. Last year I served BLT Bites; toasted brioche rounds with sundried tomato spread, arugula, roasted garlic aioli and crisp applewood smoked bacon.

            photo of my last year's offering courtesy of Eat to the Beat's twitter page
            This year, inspired by the season I prepared a Butternut Squash and Apple Soup with a Hint of Maple Syrup.

            Because I prepared this soup for 1000 people I don't have the exact recipe but here is a scaled down version that is pretty much the same. I topped the soup off with some sour cream seasoned with sage and chives and some candied pumpkin seeds.

            Butternut Squash and Apple Soup with Maple Syrup
            Serves 4-6
            • 2 Tbsp. olive oil
            • 1 small spanish onion, chopped
            • 1 rib of celery, chopped
            • 2 cloves of garlic, chopped 
            • 1 tsp. fresh chopped ginger 
            • 1/2 Tbsp. chopped fresh sage
            • 1 lb. butternute squash, peeled and cut into cubes
            • 1 granny smith apple. peeled, cored and cubed
            • 4 cups (1 L) chicken or vegetable stock
            • 1-2 Tbsp. maple syrup
            • salt and pepper to taste
            1. Heat a small stock pot over medium-high heat. Add the olive oil, then the onions. Saute the onions until softened and starting to turn golden then add the celery, garlic, ginger and sage. Continue to cook until softened. Add in the squash and apples and continue to cook for a minute longer.
            2. Pour in the stock. it should be enough to cover the vegetables. Bring to a boil then cover and lower the heat. Let simmer until vegetables are soft and tender, about 30-40 minutes.
            3. Using a hand blender, puree the soup until smooth. Stir in maple syrup, salt and pepper to taste.


              Monday, October 17, 2011

              Sesame Street Cake Pops

              One of my nephews turned two a few weeks ago. He loves Elmo (or "Melmo" as he calls him) so I decided to make him some Elmo cake pops to celebrate.

              I followed the basic instructions from the amazing Bakerella's post here but slightly changed things up a bit.

              For the eyes instead of the white candy that she used I found candy googly eyes from Wilton at Bulk Barn, you can also purchase them here.

              For the nose Bakerella used a whole orange jelly bean. I found it easier to cut the jelly bean in half lengthwise creating a flat and sticky surface to stick the nose on with. If you are going to make these at home make sure to buy smaller jelly beans (like Jelly Belly).

              For the fur, Bakerella used a method of using a toothpick to paint the fur on using the candy melts. I found it a little less time consuming to use red sprinkles for the fur. I used the same method and order as Bakerella but when she painted I sprinkled the pops with the sprinkles.

              A few days after my nephews birthday I got a call from a friend of my sister-in-law's who asked me if I could make some Elmo cake pops for birthday party she was throwing for her daughters. As well as Elmo she wanted some Cookie Monster pops as well. The method for Cookie Monster was the same, but he didn't have a nose and I used half of a mini chocolate chip cookie instead of the mouth.

              Here is how everything turned out:

              Tuesday, October 11, 2011

              Warm Roasted Garlic and Caramelized Shallot Dip

              Jord and I attended a pot luck Thanksgiving yesterday. For our contribution I made a delicious Cauliflower and Cheddar Casserole (my Mom's secret recipe...okay its not so secret you can find it on the back of a Campbell's soup can). I also whipped up a delicious warm dip. Unfortunately I did not grab a pic of the dip before it was devoured but I thought it was worth sharing the recipe anyway. This dip is perfect served with crackers, chips or cut up veggies.

              Warm Roasted Garlic and Caramelized Shallot Dip
              Serves 4-6 as an appetizer
              • 2 heads garlic
              • 2 medium shallots, sliced
              • 1 Tbsp. olive oil
              • 1 package (250g) cream cheese, at room temperature
              • 1/2 cup mayonnaisse
              • 1 tsp. Dijon mustard
              • a sprinkling of goat cheese
              • kosher salt and freshly ground pepper to taste
              1. Preheat the oven to 450 degrees F. Using the two heads of garlic, follow my instructions for roasting garlic found here.
              2. While the garlic is roasting, prepare the shallots. Heat a small saute pan over medium-high heat. add 2 tsp. of the olive oil and the shallots. Cook stirring occasionally until starting to brown then lower the heat to low and continue to cook until the shallots are soft and golden brown, about 10 minutes. Remove the shallots to s mixing bowl.
              3. Remove the garlic from the oven and let cool. Turn the temperature of the oven down to 400 degrees F.
              4. Once the garlic is cool enough to handle, remove the soft cloves and mash with a fork. Add the garlic puree to the shallots.
              5. Combine the shallot and garlic mixture with the cream cheese, mayonnaise and Dijon. Season with salt and pepper and transfer to an ovenproof baking dish. 
              6. Top the dip with a sprinkling of bread crumbs and a drizzle of the remaining olive oil. Place in the oven and bake until bubbly and hot, about 20 minutes.
              7. ENJOY!
              Image Courtesy of www.thegraphicsfairy.com

              Thursday, September 22, 2011

              Eating Las Vegas!

              Jordan and I recently returned from Las Vegas to celebrate Jordan's 30th birthday.

              This was my first trip to Vegas and I loved it!!!

              Besides lots of shopping, gambling, race car driving and other fun activities the thing we did the most of was EATING!!!!

              Our first dinner took place at Thomas Keller's Bouchon. When we sat down we were brought some fresh made baguette and warm pistachios, it was the perfect way to begin a meal. We then started off with a Heirloom Tomato Salad with Mache, Crispy Shallots & a Basil Seed Emulsion and an order of Beignets de Brandade de Morue (salt cod fritters with tomato confit and fried sage). For our mains Jordan ordered the Roasted Leg of Lamb with Lemon-Braised Escarol, Hen-of-the-Woods Mushrooms, Toasted Quinoa & Lamb Jus and I ordered the Roasted Chicken with Sweet Corn, Fingerling Potatoes, Bacon Lardon & Savory-Infused Chicken Jus. I don't usually order chicken in a restaurant but it came highly recommended from the server and I was NOT disappointed. I must say it was the best chicken I have ever eaten. For dessert we were brought a surprise of Chocolate Bouchons (mini chocolate cakes) with Homemade Strawberry Ice cream. DELICIOUS!!!


              Jordan's 30th birthday dinner took place at STK in the Cosmopolitan. This place is known more for the social scene then the food but we were definitley not disappointed with our meal. When we sat down we were first brought some delicious hot bread served with some blue cheese butter and chive oil, we were off to a good start. To begin the meal, Jordan and I shared their Shrimp Rice Krispie: three jumbo shrimp served a top of crunchy fried rice then topped with hot bisque right before serving, it was delicious. Jordan and I both went with the 20 oz bone-in rib eye steak for our main (not to share, we each got our own!) and we shared a side of macaroni and cheese and crunchy broccolini. It was  typical steak house fare, but it was done to perfection. To celebrate Jordan's big 3-0 birthday we were given a selection of their delicious desserts to enjoy. Even though we both just ate 20 oz of beef we still managed to enjoy the three mini ice cream cones (strawberry, mango and coffee), cheesecake lollipops, creme brulee, and a few other goodies.


              For lunch the next day we headed to Mario Batali's Otto Enoteca Pizzeria in The Venetian. We shared an order of Arancini (deep fried risotto balls stuffed with cheese) with fresh made tomato sauce for dipping to start. Jordan then ordered the pepperoni pizza and I went with the pizza of the day, a white pizza base with Burratta cheese, caper berries, chili and fresh parsley. The pizza crust was thin and crispy and was the perfect lunch.


              For our final dinner we went to Bobby Flay's Mesa Grill in Caesar's Palace. The restaurants in Vegas sure know how to start off a meal as a basket of freshly made bread (three different kinds) was brought to our table as soon as we sat down. We started our meal with a Shrimp & Roasted Garlic Corn Tamale in a Corn & Cilantro Sauce and Yucatan Chicken tacos with Fire Grilled Red Onions & Peanut-Smoked Chili BBQ Sauce. Jordan then ordered the Fire Roasted Veal Chop with a Horseradish & Maple Glaze served with a Wild Rice Tamale & Sage Butter. I went with the Yucatan Style Grouper with a Blue Crab Succotash Sauce. We also shared the Cornmeal Crusted Chili Relleno with Black Beans, Rice & Cheese as our side. This meal was delicious and after three nights of delicious meals we no longer had room for dessert (until later that night when I went for some watermelon gelato in our hotel!).


              After four delicious days of eating in Las Vegas I am now back home eating lettuce.....

              Thursday, September 1, 2011

              Tales from our Garden: Fresh Tomato Sauce

              Our garden definitely has no lack of tomatoes and because we are only two people I needed a way to use up a bunch before they all went bad so last week I decided to whip up some delicious fresh tomato sauce and finished it off with some fresh garden picked basil. I must say it was one of the best tomato sauces I have ever eaten.

              Since making this batch a week a go we now have a fresh batch of picked tomatoes, two HUGE bowl fulls to be exact. This weekend I am going to make a super large batch of this sauce and freeze it in individual portions that way we can enjoy our fresh garden tomato sauce all year long.

              Fresh Tomato Sauce
              Makes about 2 cups of sauce
              • 1 Tbsp. olive oil
              • 1 small yellow onion, chopped
              • 2 cloves of garlic, chopped
              • 10 medium sized plum tomatoes, peeled (see how here) and chopped 
              • salt and pepper to taste
              • fresh torn basil 
              1. Heat a large saute pan over medium high heat. Add the oil, onions and garlic and saute until softened and lightly golden.
              2. Add in the tomatoes, lower the heat and let simmer for 30-45 minutes stirring occasionally until you have a nice thick tomato sauce
              3. Season with salt and pepper to taste and finish with a good sprinkling of fresh torn basil.


                Wednesday, August 31, 2011

                How-To: Peeling Tomatoes

                This was one of the first things I was taught in culinary school. It is not often that you need to peel a tomato but this trick comes in handy for the few times that you do.


                Step 1: Using a small paring knife, gently pierce the skin on the bottom of a tomato into an "X" shape


                Step 2: Plunge the "X"ed tomatoes into a pot of boiling water for about 30-45 seconds


                Step 3: Remove the tomatoes from the boiling water and immediately place into a bowl of ice water, let sit for about one  minute.


                Step 4: Remove tomatoes from the ice water. Starting with the "X" gently pull away the tomato skin, you can use a paring knife to help out.


                Peeled tomatoes are perfect for making fresh tomato sauce, recipe here

                Friday, August 26, 2011

                Best Cookies Ever!!!

                This cookie recipe is based on one that I have used at work, I am not sure where it came from but it is too good not to share. I used Skor bits for this past batch but you can change it up to chocolate chips, white chocolate chips or whatever you heart desires. These cookies are perfectly soft and buttery but still get that crispy edge. Try them and I promise you wont be disappointed.

                Best Cookies Ever
                Makes about 2 dozen
                • 2 cups all purpose flour
                • 1 tsp salt
                • 1 tsp baking soda
                • 2 sticks unsalted butter
                • 1 cup brown sugar
                • 3/4 cup white sugar
                • 1 tsp vanilla extract
                • 2 Tbsp. water
                • 1 egg
                • 2 cups Skor bits  (or just dump in the whole bag like I did)
                1. Preheat your oven to 375 degrees F.
                2. In a large mixing bowl whisk together flour, salt and baking soda. Set aside.
                3. In the bowl of a stand mixer, using the paddle attachment, cream the butter and both sugars together until creamy and smooth. Add vanilla, water and the egg and continue to mix until combined.
                4. With the mixer on low speed, add the flour mixture a little bit at a time until completely combined. Turn the mixer off, remove the bowl and stir in the Skor bits (or whatever you are using).
                5. Using a teaspoon or a small ice cream scoop, place rounds of the cookie dough onto a parchment lined baking sheet spacing the cookies about 1 inch apart.
                6. Place in the oven and bake until light golden brown, about 10-12 minutes.
                7. Remove from oven and allow to cool on a baking rack (or eat while still warm like I do!)


                  Thursday, August 11, 2011

                  Roasted Potato Salad with Lemon and Dill Dressing

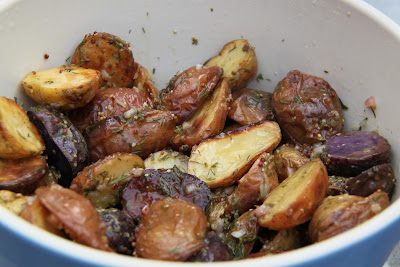
                  My favourite thing about summer time is attending BBQs and nothing says Summer BBQ more than potato salad. As much as I LOVE creamy potato salad, this past weekend I decided to make something a a little lighter. I roasted the potatoes before hand to add extra flavour and texture, and the lemon and dill brighten up the dish. I promise you wont miss the mayo!

                  Roasted Potato Salad with Lemon and Dill Dressing
                  Serves 6 as a side
                  • 3 lbs. baby potatoes, sliced in half lengthwise (I used this bag of coloured baby potatoes)
                  • 2 Tbsp. plus 2/3 cup olive oil
                  • 1 shallot, finely chopped
                  • 1/3 cup lemon juice
                  • zest of 1 lemon
                  • 2 tsp. grainy dijon mustard
                  • 1 tsp. honey
                  • 1/2 cup chopped dill
                  • salt and pepper to taste
                  1. Place a large baking sheet in your oven and pre-heat  to 450 degrees F.
                  2. While the oven is preheating, toss the potatoes with the 2 Tbsp of olive oil and season with salt and pepper in a large mixing bowl
                  3. Once the oven is preheated, carefully pull out the baking sheet and pour the seasoned potatoes on the sheet. Place in the oven and roast until cooked through and crispy, flipping halfway through cooking about 25 minutes.
                  4. While the potatoes are roasting, whisk together the shallots with the lemon juice, zest, mustard and honey. While whisking slowly pour in the remaining olive oil until the dressing is emulsified. Season with salt and pepper.
                  5. Once the potatoes are cooked, transfer into a large mixing bowl, while still warm toss with the dressing and the chopped dill.
                  6. The salad can be served warm or at room temperature.

                  Thursday, August 4, 2011

                  Tales from our Garden: Zucchini Fritters

                  Jordan and I took advantage of this past holiday Monday and spent the day lazily lounging in our backyard enjoying the quiet and the beautiful weather.

                  Mid-afternoon I took a small break from the outdoors to fix us a quick lunch. On my way inside I picked a large zucchini and some parsley from our garden. I got inside and decided to whip up a quick batch of zucchini fritters (kind of like a potato latke but with zucchini instead of potato)

                  They were the perfect light lunch to enjoy outdoors with a nice cold glass of white wine. It was a perfect afternoon!

                  Zucchini Fritters (adapted from a recipe in Martha Stewart Living)
                  Makes about 6 large fritters
                  • 1 medium sized zucchini
                  • 1/4 of a Spanish onion
                  • 2 Tbsp. chopped Italian parsley
                  • 1 Tbsp. parmesan cheese
                  • 2 Tbsp. flour
                  • 1 large egg
                  • the zest of 1 lemon
                  • salt and pepper to taste
                  • olive oil for frying
                  1. Using the large side of a box grater, grate the zucchini and onion onto a large, clean tea towel. Squeeze any excess moisture out from the zucchini and onion using the towel and then empty out into a large mixing bowl.
                  2. Combine the zucchini and onion with the parsley, cheese, flour, egg, lemon zest and salt and pepper.
                  3. Heat a large saute pan over medium-high heat. Once heated pour in enough olive oil to cover the bottom of the pan. Spoon in mounds of the zucchini mixture, flattening with the back of the spoon.
                  4. Cook until crisp on both sides, about 2-3 minutes a side and transfer to a paper towel lined plate. 
                  5. Sprinkle with some sea salt and serve.

                  Sunday, July 31, 2011

                  Tales from our Garden: Zucchini, Ricotta and Lemon Flatbread

                  Our zucchini is growing like crazy!!! Check out these gigantos:


                  This weekend I used up some zucchini in a zucchini-date loaf and last night I used up some more in a delicious and simple zucchini flat bread to accompany some pasta for dinner.

                  Zucchini Flatbread
                  Serves 4 as an accompaniment to a meal
                  •  1 cup ricotta cheese
                  • 1 large clove of garlic, chopped 
                  • zest of 1 lemon
                  • small handful of parsley, chopped
                  • 1 store bought pizza or flat bread crust
                  • 1 green zucchini, sliced into rounds
                  • 1/2 red onion, sliced
                  • drizzle of olive oil
                  • salt and pepper
                  1. Preheat the oven to 425 degrees F.
                  2. In a mixing bowl, stir together the ricotta cheese, garlic, lemon zest and parsley. Season with salt and pepper.
                  3. Place the crust onto a baking sheet drizzled with olive oil. Spread the ricotta mixture onto the crust and top with the zucchini rounds and red onion.
                  4. Drizzle the flatbread with some more olive oil and place in the oven. Bake until the crust is golden and crisp and the cheese is bubbly, about 15 minutes.
                  5. Enjoy!

                  Wednesday, July 27, 2011

                  Fruity and Refreshing Ice Pops!!!

                  The other night I took my new Zoku Ice Pop Maker for a spin using some delicious raspberries from my garden. I made six ice pops in two different flavours, both featuring the freshly picked berries; Raspberry-Lime and Raspberry-Kiwi!


                  For the first flavour I prepared some homemade limeade. I combined 1/2 cup of water with 1/2 cup of sugar in a small saucepot to create a simple syrup. I placed the pot over medium-low heat and heated until the sugar was dissolved. I then combined the sugar mixture with 1/2 cup of fresh lime juice and 2 cups of ice cold water. Once I had my limeade prepared, I stuck some whole raspberries onto the wall of my ice pop maker, then proceeded to pour in my limeade and waited until they froze.

                  For the second flavour, I pureed 1 cup of raspberries with 1 sliced kiwi and 1 cup of water and about one Tbsp. of sugar (the amount of sugar will depend on the sweetness of your fruit).I then passed the puree through a strainer and let it chill. I then lined my ice pop maker with some freshly sliced kiwis before pouring in the fruit puree.

                  If you don't have one of these fantastic little gadgets, you can use traditional ice pop molds and wait for them to freeze overnight.

                  Look how pretty they look! They were also delicious and perfect for a warm summer night!


                  This new gadget is certainly helping me to get in my daily fruit servings and offers a healthier summer time snack then ice cream!!! I can't wait for the next round.....

                  Sunday, July 24, 2011

                  Look What I Got!!!

                  I apologize for the lack of posting. Lately things have been pretty crazy at work with a kid's cooking camp one week and then a teen cooking camp the next! Things have settled down and I will be back to regular posting.

                  In the meantime check out this amazing new gadget I just picked up for myself:
                  The Zoku Quick Pop Maker allows you to make ice pops in 7-9 minutes!!! I am so excited to try out exciting flavours and combinations and will be sure to post all my experiments. In the meantime check out their website here.

                  In The GTA you can purchase your own Zoku Ice Pop maker at Nella Cucina.

                  Stay tuned....

                  Monday, July 4, 2011

                  Steak Sandwiches x 2

                  When I first started dating my now husband (Jordan) his tastes were pretty steak and potatoes, literally! Although over the past 6 years I have gotten him to expand his palate there are still some things I can't get him to budge on (like fancy cheese). The other night I decided to make steak sandwiches for dinner, the only problem is that when I think of steak sandwiches I think of fancy toppings like blue cheese, caramelized onion and arugula and Jordan thinks of steak and barbecue sauce. Tonight, to satisfy both of us I made two different sandwiches, a fancy steak sandwich and a not so fancy one.

                  I topped my sandwich with a horseradish and blue cheese cream, caramelized onions and arugula and for Jordan I did a simple sandwich with barbecue sauce and sauteed onions and peppers.

                  I simply grilled the steak up on the barbecue then let it rest before thinly slicing it and placing it on some nice bread and topping with our desired toppings.

                  Here are the recipes for the toppings:

                  Simple Homemade Barbecue Sauce
                  • 1 Tbsp. vegetable oil
                  • 1 small onion, chopped
                  •  2 cloves of garlic, chopped
                  • 1 Tbsp. tomato paste
                  • 1 small can (398 ml) diced tomatoes
                  • 1/4 cup brown sugar
                  • 1 Tbsp. Worcestershire sauce
                  • 1/4 cup white vinegar
                  1.  Heat a medium saucepan over medium-high heat. Add oil then add the onion and garlic and cook until the onion is translucent. 
                  2. Stir in the tomato paste and cook for 1 minute then stir in the diced tomatoes, brown sugar, Worcestershire sauce and white vinegar. 
                  3. Bring to a boil, then lower the heat, cover and let simmer for 30 minutes. Using a hand blender puree until smooth. Season with salt and pepper. 
                  4. Once cool, store in an airtight container in the refrigerator for up to a week.
                  Perfect Caramelized Onions
                  • 1 Tbsp. vegetable oil
                  • 1 large Vidalia onion, sliced
                  1. Heat a large saute pan over high heat, once hot add the oil and swirl to coat the pan then add the onions.
                  2. Cook the onions over high heat and cook until starting to brown, stirring occasionally. It will look like they are going to burn, this is okay. This is the sugar releasing from the onions, you need this for proper caramelizing. This will take about 5 minutes.
                  3. Once the onions are browned, lower the heat to medium low and continue to cook for 30 minutes, stirring occasionally. 
                  4. The onions are done when they are wilted, golden brown and syrupy.
                  Horseradish and Blue Cheese Cream
                  • 1/4 cup crumbled blue cheese
                  • 1/4 cup mayonnaise
                  • 1/4 cup sour cream
                  • 1 Tbsp. chopped chives
                  • 1 Tbsp. horseradish
                  • 1 tsp. Dijon mustard
                  • salt and pepper to taste
                  1. Place all the ingredients in the bowl of a food processor and blend until smooth.
                  2. Season with salt and pepper to taste.
                  3. Can be stored in an airtight container in the refrigerator for up to two weeks.


                  Wednesday, June 29, 2011

                  I Scream, You Scream.....

                  My sister-in-law just graduated from school as a Doctor of Chiropractic. To celebrate the occasion my in-laws threw a fabulous party. Most of the party was catered but my mother-in-law asked me to help out with the dessert table.

                  Inspired by a post by Amy Atlas (here), we decided to put together an ice cream sundae bar. We got various ice cream flavours, and stored them in large ice buckets and then filled a table with various glass vessels full of toppings that included: chocolate sauce, sprinkles, cookies, candies and much, much more!

                  In addition to the ice cream I wanted to make another little treat. Inspired by my previous post (here) and Bakerella's post (here) I decided to make Ice Cream Cone Cake Pops. They were SUPER cute!

                  Check them out:


                  The party was so much fun and the dessert was a HUGE hit! Congrats Deb!!!

                  Friday, June 17, 2011

                  Smoky Chipotle and Lime Flank Steak Tacos

                  The other night I had a craving for tacos, but not the ground beef and crispy shell mess that my husband loves, I wanted traditional tacos with fresh corn tortillas, grilled steak and fresh toppings.

                  I chose to use a flank steak. I marinaded the steak the night before, then we grilled it up on the BBQ, before slicing it up and serving it with tortillas and traditional taco toppings. YUM!

                  Smoky Chipotle and Lime Flank Steak
                  Serves 4
                  • 1 flank steak (about 2 lbs.)
                  • 1/2 cup smoky BBQ sauce (like this one)
                  • juice and zest of 2 limes
                  • 2 Tbsp. honey
                  • 1-2 Tbsp. pureed chipotle in adobo sauce (use more or less depending on your taste)
                  • 1 Tbsp. olive oil
                  1. Place the steak into a large zip-lock bag.
                  2. Whisk together the remaining ingredients and pour over the steak. Make sure the steak is covered and refrigerate over night.
                  3. Before grilling, remove the steak from the fridge to take the chill off.
                  4. Heat your grill to high heat. Remove the steak from the marinade and grill until cooked to desired doneness (about 4 minutes per side for medium rare).
                  5. While the steak is grilling, pour the extra marinade into a small saucepan. Place over medium-high heat on the stove and bring to a boil, lower heat and let simmer for about 5 minutes.
                  6. Remove the steak from the grill and allow to rest for 5-10 minutes before slicing. Thinly slice the steak and serve with your choice of taco accompaniments including the sauce made from the leftover marinade.
                  7.  

                    Wednesday, June 15, 2011

                    Strawberry Macarons

                    This past weekend my friend asked me to make some macarons for a bridal shower she was throwing. Macarons can be very temperamental but I was very happy with the way they turned out. 

                    Last night, after flipping through the channels only to find nothing interesting on TV, I headed into the kitchen and decided to make a batch for myself with the leftover ingredients. Inspired by the bright pink peonies I picked from my garden a few days ago, I went with a pink cookie with a strawberry frosting for the center.

                    For the cookies I used Bakerella's recipe found here.

                    For the filling I made a delicious, yet rich strawberry frosting. Here is the recipe:

                    Strawberry Frosting (For cookies, cakes, cupcakes and eating off a spoon)
                    Makes about 2 cups
                    • 1 stick (1/2 cup) butter, at room temperature
                    • 2 Tbsp. good quality strawberry preserves
                    • 1- 1.5 cups icing sugar 
                    1. Place the butter in the bowl of a stand mixer with a paddle attachment and mix until fluffy.
                    2. Stop the machine and add the preserves. Mix until combined.
                    3. Turn the machine to low, and while running, slowly add the icing sugar, 1/2 cup at a time until desired consistency is achieved. The more sugar you add the more dense the frosting. 
                    4. Turn the machine to high and mix for another minute until fluffy. 

                    Tuesday, June 14, 2011

                    Tales from our Garden: Roasted Garlic Caesar Salad

                    The time has come to finally pick some of the vegetables that we planted and I could not be more excited!

                    We planted three types of lettuce - Green Romaine, Red Romaine and Boston. All three are growing at a rapid pace so after researching on the internet I found out that I can pick some of the outer leaves of lettuce while the plants are still young and the plant will continue to grow. Yesterday, I headed out to the garden and plucked a bunch of leaves off of each of my Green Romaine plants.

                    The lettuce right before I picked it
                    When I think of Romaine lettuce I automatically think of Caesar salad so that is exactly what I made with my garden pickings.
                     
                    Here is my recipe for Caesar salad. I like to roast the garlic for the dressing instead of using it raw. I love the sweetness of roasted garlic, and the fact that I don't have to chew a pack of gum after eating it.

                    Roasted Garlic Caesar Salad
                    Serves 4
                    • 1 head of garlic
                    • 1 egg (traditionally a coddled egg is used)
                    • 2 Tbsp. lemon juice
                    • 2 tsp. Dijon mustard
                    • 2 tsp. anchovy paste (can be replaced with 1 Tbsp. Worcestershire sauce)
                    • 1/3 cup good quality olive oil
                    • 1/4 cup freshly grated Parmesan cheese, plus more for garnish
                    • salt and freshly ground pepper
                    • 2 heads of romaine lettuce, ripped or cut into small pieces 
                    • homemade or store bought croutons
                    • 4 slices of bacon or pancetta, cooked until crisp and crumbled
                    1. Pre-heat the oven to 450 degrees F.
                    2. Follow my instructions on How-To: Roast Garlic.
                    3. In the bowl of a food processor  place the egg, lemon juice, Dijon and anchovy paste. Turn the machine on and slowly drizzle the olive oil through the feed tube until the mixture is thick and emulsified.
                    4. Turn the machine off and add in the parmesan cheese and the roasted garlic paste, pulse the machine until just combined. Season with salt and pepper to taste.
                    5. In a large salad bowl toss the lettuce, croutons and bacon with your desired amount of dressing.Top with some more Parmesan and serve.
                    *Tip: If you are worried about using a raw egg, or you just want to make the process quicker  you can replace the egg and olive oil with 3/4 cup of store bought mayonnaise (I love Hellman's Half the Fat). Simply stir the mayo together with the lemon juice, Dijon, anchovy paste/Worcestershire, parmesan, garlic, salt and pepper. 

                    Thursday, June 9, 2011

                    Delicious Lamb Marinade

                    Last week I taught a Cottage Entertaining class at work. The chef for the night, Sandra Katsiou developed an amazingly delicious leg of lamb recipe for the class. I have been dreaming about the lamb ever since so I decided to make it tonight. A leg of lamb is too large just for the two of us, so I used the marinade on some  lamb chops. I served it up with some salad and it was perfect summer evening dinner.

                    Sandra's Lamb Marinade
                    • 1/2 cup honey
                    • 1/4 cup regular dijon mustard
                    • 1 Tbsp. grainy dijon mustard
                    • 1/4 cup olive oil
                    • 1/4 cup fresh mint, chopped
                    • 1/4 cup fresh rosemary, chopped
                    • 2 shallots, minced
                    • 6 cloves of garlic, minced
                    • 1 tsp. cumin seeds
                    • the juice of 2 lemons
                    • salt and pepper to taste
                    1. In a mixing bowl, whisk together all the ingredients until combined.
                    2. Pour all but 3 Tbsp. of the  marinade into a zip lock bag with the lamb and let marinade for at least 1 hour or overnight.
                    3. Grill your lamb on the BBQ, basting with the reserved marinade.

                      Tuesday, June 7, 2011

                      How-To: Oreo Pops!

                      Desserts on a stick are the newest trend, and one that I LOVE! Oreo pops are a new one that I have seen popping up around the blog world. This weekend my sis-in law and I decided to whip some up. They were super quick and easy and only required 3 ingredients. *Please note: doubled stuffed Oreos work the best but we also experimented with some Fudgee-O's which were equally delicious!

                      Check out this quick how-to:

                      1. Take a lollipop stick or skewer and push it through the cream center of an Oreo cookie, making sure to only go 3/4 of the way up.

                      2. Melt some chocolate (we used white).  Using a spoon to help, cover the cookie with the melted chocolate.

                      3. Place on a parchment lined baking sheet and sprinkle with sprinkles or any other decoration of your choice.

                      4. Repeat with the remaining Oreos and place in the fridge to harden.

                      5. ENJOY!

                      click to enlarge

                      Thursday, May 26, 2011

                      Crab Cake Sliders

                      Whenever I travel to the states I always make sure to visit The Cheesecake Factory. I know it isn't exactly a gourmet restaurant, but there is just something comforting about it that always draws me in. One of my favourite Cheesecake dishes is their Crab Cake Sandwich; a large crab cake sandwiched between a brioche bun and topped with crisp lettuce, fresh tomato and tartar sauce. Delicious, right? Well tonight, I decided to make my own version of the sandwich except that I made it miniature; Introducing The Crab Cake Slider!!!

                      These sliders are perfect for entertaining or a delicious week night treat as I enjoyed them tonight! Enjoy!

                      Crab Cake Sliders
                      Makes 8 Sliders
                      • 1/2 lb. fresh crab claw meat, picked through for shells
                      • 1 Tbsp. Hellman's Half the Fat mayonnaise
                      • 2 Tbsp.chopped chives
                      • 1 tsp. Frank's Red Hot hot sauce
                      • 1 tsp. dijon mustard
                      • 1 egg, beaten
                      • bread crumbs
                      • panko bread crumbs for dredging
                      • salt and pepper to taste
                      • 2 Tbsp. melted butter
                      • 8 slider buns
                      • Boston lettuce leaves, sliced tomatoes and tartar sauce (recipe below) for garnish
                      1. In a large mixing bowl gently mix together crab meat, mayo, chives, hot sauce, dijon, egg and bread crumbs until just combined, be careful not to break up crab meat too much. Place the panko bread crumbs in a shallow dish, season with salt and pepper and set aside.
                      2. Using your hands, form crab mixture into small slider patties, dredge in the seasoned panko and place on a a gently greased baking sheet. Repeat until entire mixture is used. Chill the sliders in the fridge for about 15-20 minutes (this will help hold them together when cooking)
                      3. Pre-heat your ovens broiler. Brush the tops of the crab cakes with some melted butter and place in the oven for 5 minutes, the tops should be golden brown. Remove the pan from the oven, flip the cakes over and brush with some more melted butter. Return to the oven and bake for an additional 3 minutes.
                      4. Spread a little tartar sauce on the bottom of a slider bun, top with some shredded lettuce, a slice of tomato and a crab cake, top with the bun top. Repeat with remaining cakes and buns.

                      Not Your Average Tartar Sauce
                      Makes about 1 cup (you will have leftovers)
                      • 3/4 cup Hellman's Half the Fat mayonnaise
                      • 1/2 tsp Old Bay seasoning
                      • 2 tsp. capers, roughly chopped
                      • 2 tsp. dill relish
                      • 1 tsp. grainy dijon mustard
                      • zest of 1 lemon 
                      • squeeze of lemon juice
                      • hot sauce to taste
                      • salt and pepper to taste
                      1. In a small mixing bowl combine all ingredients. Season with salt and pepper to taste.


                        Wednesday, May 25, 2011

                        Tales from our Garden

                        Welcome to the first edition of Tales from our Garden!

                        The past owners of our house were really into gardening and we were lucky to inherit their wonderfully landscaped backyard complete with beautiful flowers, plants and a great vegetable garden. Most vegetables are annuals and have to be replanted every year, so after a few long weeks researching on google, and a trip to a local nursery, we took advantage of the warm long weekend and got to work!

                        Here is picture of what we planted:
                        In the garden: Three types of tomatoes, two types of bell peppers, zucchini, cucumber, leeks, green onions, 4 types of lettuce, basil, sage, rosemary, parsley, thyme and strawberries!

                        In addition to what we planted, we were also pleasantly surprised to find a few perennial herbs and vegetables hidden around the garden:

                        We found this overgrown asparagus plant which was a great surprise since asparagus is one of my favourite vegetables. Did you know that asparagus can grow up to 5 ft?!?!

                        We also found beautiful herb plants like chives, mint and oregano.

                        Be sure to keep checking back as I will keep you updated on the progress of the vegetables as well as delicious recipes to accompany them!

                        Thursday, May 19, 2011

                        Quick Meal: Pizza-nini

                        Last night was one of those evenings where I had an hour after getting home from work to not only make dinner but eat it too as we had an appointment to get to. I didn't want to just go through the drive through on my way home so I whipped up something I have made before that is super simple, delicious and you don't even need to turn on your oven.

                        A pizza-nini is essentially, a panini made out of pizza ingredients. I use store bought pizza crust and spread on my favourite toppings. Instead of baking the pizza in the oven, I fold it in half, brush it with some olive oil and grill it on my panini press until the cheese is all melted and then eat it like a sandwich.

                        You can go classic with cheese and tomato sauce like this pizza-nini for my hubby:


                        Or you can get a little fancier like this proscuitto, ricotta, fig and arugula one for me:


                        Get creative!

                        To round out the meal serve with a salad and you have a quick and delicious dinner in no time. These are great for entertaining and make great appetizers or hors d'oeuvres when cut up into bite size pieces.
                        .

                        Monday, May 16, 2011

                        I'll be back....

                        To all my followers I apologize for the lack of posting recently. I was on vacation and then had some family obligations which kept me busy, but I promise to be back in full force tomorrow!

                        In other news, we bought a new BBQ this weekend so be sure to keep checking back for great summer BBQ recipes!!!

                        Tuesday, April 19, 2011

                        Passover Recipe: Roasted Sweet Potato Salad

                        Last night marked the official start of Passover so I spent yesterday in the kitchen helping my mother with the cooking for the first Seder. My mom is pretty much a Seder pro at this point and has got the chicken soup and brisket down to an art so she left me in charge of the side dishes.

                        This dish was new this year, but will definitley become part of our regular Seder repertoire. It is served at room temperature which makes leftovers perfect to take to work for lunch instead of the typical matzah and cheese which ends up being crumbs by the time lunch hour rolls around.

                        Roasted Sweet Potato Salad
                        Serves 12 as a side dish
                        • 4 lbs. sweet potatoes, peeled and cut into cubes
                        • 1 Tbsp. plus 1/4 cup olive oil
                        • 2 Tbsp. maple syrup
                        • juice of one orange
                        • juice of one lemon
                        • 1/2 tsp. cinnamon 
                        • pinch of nutmeg
                        • 1 cup Italian flat leaf parsley, roughly chopped
                        • 3 green onions, white and green, thinly slice
                        • 1 cup pecans, toasted and roughly chopped
                        • 1 cup golden raisins
                        • salt and pepper
                        1. Pre-heat the oven to 400 degrees F.
                        2. In a large mixing bowl, toss the sweet potato with 1 tbsp. of the olive oil and salt and pepper. Place onto a baking sheet and roast until golden and tender, tossing halfway through, about 30 minutes.
                        3. Meanwhile, whisk together remaining olive oil, maple syrup, orange juice, lemon juice, cinnamon and nutmeg. Season with salt and pepper and set aside.
                        4. Remove potatoes from oven and slightly cool.
                        5. While still warm, toss potatoes with parsley, onions, pecans and raisins. Pour the dressing on top and set aside.
                        6. Serve warm or at room temperature.

                        Friday, April 15, 2011

                        Ravioli with Sweet Corn, Leeks and Bacon

                        With its bright colours and light sauce this pasta dish is a delicious way to welcome spring!!!

                        This sauce goes great with fresh Fettuccine as well.

                        Ravioli with Sweet Corn, Leeks and Bacon
                        Serves 4
                        • 4 ears of corn, shucked, kernels removed
                        • 1 cup vegetable broth
                        • 1/4 cup cream
                        • 4 slices of bacon, chopped
                        • 2 leeks, sliced
                        • 2 cloves of garlic, minced
                        • 2 sprigs of thyme, leaves removed and roughly chopped
                        • 1 red pepper, diced
                        • 1 lb. package of ricotta and spinach ravioli
                        • Kosher salt and freshly ground pepper
                        • Hot sauce to taste
                        • ½ cup flat leaf parsley, chopped
                        • Freshly grated Parmesan cheese
                        1. Bring a pot of salted water to a boil.
                        2. In the meantime, in a blender or food processor combine 1 cup of the corn kernels with the broth and cream. Blend until combined and set aside.
                        3. Heat a large sauté pan over medium high heat, add the bacon and cook until just starting to crisp. Add the leeks, garlic and thyme. Cook until softened and the leeks are lightly brown, about 3 minutes.
                        4. Stir in the red pepper and remaining cornand cook until pepper is soft and corn is cooked through about 3-5 minutes. Pour in the broth mixture, stirring to combine. Lower heat and let simmer while you cook the pasta.
                        5. Cook the pasta in the boiling water according to package directions, drain and set aside.
                        6. Check the seasoning of the sauce and adjust with salt, pepper and hot sauce, stir in parsley. Toss the seasoned sauce with the drained pasta and top freshly grated Parmesan cheese before serving.

                          ENJOY!

                            Thursday, April 7, 2011

                            Weekday Cooking: Peanut Chicken Stir Fry

                            I had a friend ask me the other day how she can make the process of making dinner during the week easier. Like a lot of us she was having a hard time getting home from work at 6pm and then having to come up with a delicious and hot dinner in a reasonable amount of time. The key to being able to cook fast is to plan ahead. I know it is easier said then done but if you can plan your meals at the beginning of the week and have all the ingredients available it will make the process much easier. A great weekday meal is stir fry. It is perfect because if you have time the night before, you can slice the protein, cut up all the veggies and have the sauce ready to go all in separate containers in the fridge. When you get home from work all you have to do is cook some rice and toss everything together in a pan.

                            This stir fry is delicious and is very versatile. Feel free to switch up the chicken with anything you have on hand like beef, shrimp or tofu, and to add any veggies you want or have on hand.

                            This stir fry is perfect with some steamed rice or noodles or as I made it tonight as a filling for lettuce wraps.

                            Peanut Chicken Stir-Fry
                            Serves 4
                            • 2 tsp. cornstarch
                            • 1 Tbsp. mirin (Japanese cooking wine, you can use sherry or any sweet wine you have)
                            • 2 Tbsp. water
                            • 1 Tbsp. soy sauce
                            • 1 Tbsp. hoisin sauce
                            • 2 Tbsp. oyster sauce (I used vegetarian oyster sauce)
                            • 1 tsp. sesame oil
                            • 1 tsp. sugar
                            • 2 Tbsp. vegetable oil
                            • 1 1/2 lbs. boneless, skinless chicken thighs or breasts, cut into small cubes
                            • 1 tsp. minced ginger
                            • 2 cloves of garlic, minced
                            • 4 green onions, sliced
                            • 1 red pepper, chopped
                            • 1 cup shitake mushrooms, sliced
                            • 1 (8oz) can, sliced bamboo shoots, rinsed and drained
                            • 1 (8oz) can, sliced water chestnuts, rinsed and drained
                            • 1 cup roasted peanuts
                            1. In a small bowl whisk together cornstarch, mirin, water, soy sauce, hoisin sauce, oyster sauce, sesame oil and sugar. Set aside.
                            2. Heat a wok or a large skillet over medium-high heat. Once hot add 1 Tbsp. of the oil and chicken and stir fry until almost cooked through, about 3 minutes. Remove from the pan and set aside.
                            3. In the same pan add the remaining oil, ginger, garlic and onion and stir fry until softened and fragrant. Add the mushrooms, peppers, bamboo shoots, water chestnuts and peanuts and stir-fry for a minute longer. Add the chicken back into the pan and pour over the stir-fry sauce. Cook until the chicken is cooked through and sauce has thickened, about 2 minutes.
                            4. Remove from heat and serve with steamed rice or wrap up in crisp iceberg lettuce leaves.

                            Related Posts Plugin for WordPress, Blogger...