Recent Posts

Showing posts with label Snacks and Desserts. Show all posts

Thursday, November 29, 2012

A Moroccan Themed "Sip n' See"

This past weekend I had the honour of working with one of my best friends to help throw her sister a "Sip n' See". A "Sip n' See" is pretty much a baby shower that happens after the baby is born so the guests actually get to see the baby while they "sip" and in this case "eat" as well.

I worked with Mandy's sister, Seri of Little Miss Party Planner back in May to help put together Mandy's bridal shower so it was nice to have the roles reversed this time.

Mandy collabarated with our friend Ashley of Ashley Lindzon Events to put together all the fine details and I was left in charge of the food. I had free reign which I LOVE, all I had to do was keep the food a Moroccan theme.

Here is what I put together for the savoury food table:
  • Morocccan Antipasto Bar: assorted breads and flat bread, roasted eggplant dip, spicy feta dip, chickpea spread, baked za'ataar goat's cheese, marniated roasted red pepper salad, citrus and spiced olives and mini falafel balls
  • Moroccan Cigars: crispy pastry filled with spiced ground beef served with a tahina dipping sauce
  • Spiced Tomato Soup Sips: shooters of warm tomato soup spiced with ginger, garlic, cumin and smoked paprika topped with a flat bread triangle
  • Chickpea Salad: spiced chickpeas tossed with fresh tomatoes, cucumber, onion and cilantro topped with a mint-yogurt drizzle and served in white wonton spoons
  • Moroccan Chicken Skewers: grilled Moroccan spiced chicken served with harissa aioli for dipping


 I kept dessert pretty simple:
  • Mini Cupcakes: mini vanilla bean cupcakes topped with an orange blossom and vanilla bean frosting garnished with candied orange peel
  • Floral Bundt Cake: a gorgeous rose shaped bundt cake studded with preserved lemons, orange and lemon zest and topped with a tangerine glaze and icing sugar sprinkle
  • Chai Creme Brulee: small portions of Chai scented creme brulee served in mini white ramekins


For beverages Mandy and Ashley put together a fabulous display of options including a Do-It Yourself Caesar bar which was a huge hit. I whipped up some Moroccan mint iced-tea which I sweetened with the leftover orange sugar from the cupcakes which added a wonderful flavour to the already delicious tea.


The event was a great success and I can't wait to work with all of these lovely ladies again soon, but maybe next time not when I am 8 and half months preggo :)

One last thing, a big shout out to the amazing photographer Robyn Harrison who took all of the amazing pictures seen on here. 

Monday, April 9, 2012

Passover Recipe: Dark Chocolate and Fleur de Sel Matzoh Crunch

It is that time of year again when Jews all around the world are celebrating Passover and thinking of creative ways to dress up the limited food that we can eat. One of the most popular Passover snacks is Matzoh Crunch; plain boring matzoh topped with delicious toffee and other delicious sweets. This year I decided to fancy up my matzoh crunch with some good quality  dark chocolate and fleur de sel. The results were SCRUMPTIOUS.

Whether  you are celebrating passover or not whip up a batch today and you will not be disappointed.

Dark Chocolate and Fleur de Sel Matzoh Crunch
  •  6 pieces of unsalted matzoh
  • 1 1/2 cups butter (or margarine)
  • 1 1/2 cups brown sugar
  • 100g bar of good quality dark chocolate
  • a few pinches of fleur de sel or other flaky salt
  1.  Preheat the oven to 325 degrees F.
  2. Lay the matzoh onto a parchment lined baking sheet (you may have to use more than one) and set aside. You can break some of the pieces of matzoh in half to fit more onto a tray
  3. In a small saucepan, over medium heat, melt the butter or margarine with the brown sugar until melted. Raise the heat to medium high and bring to a boil. Cook, stirring occasionally until starting to thicken, about 2-3 minutes.
  4. Pour the sugar mixture over the pieces of matzoh and spread using a spatula until all the pieces of matzoh are fully covered. Place in the oven and bake for 10-12 minutes, until golden.
  5. While the matzoh is baking, melt the chocolate over a double boiler or in the microwave in 30 second intervals, being very careful not to let it burn.
  6. Remove the matzoh from the oven and let cool for 2 minutes then lightly sprinkle with the fleur de sel. Allow to cool for another few minutes and then generously drizzle the chocolate over.
  7. Allow the chocolate to harden at room temperature for about 30 minutes and then break the matzoh into small pieces. 
  8. ENJOY!

    Wednesday, March 28, 2012

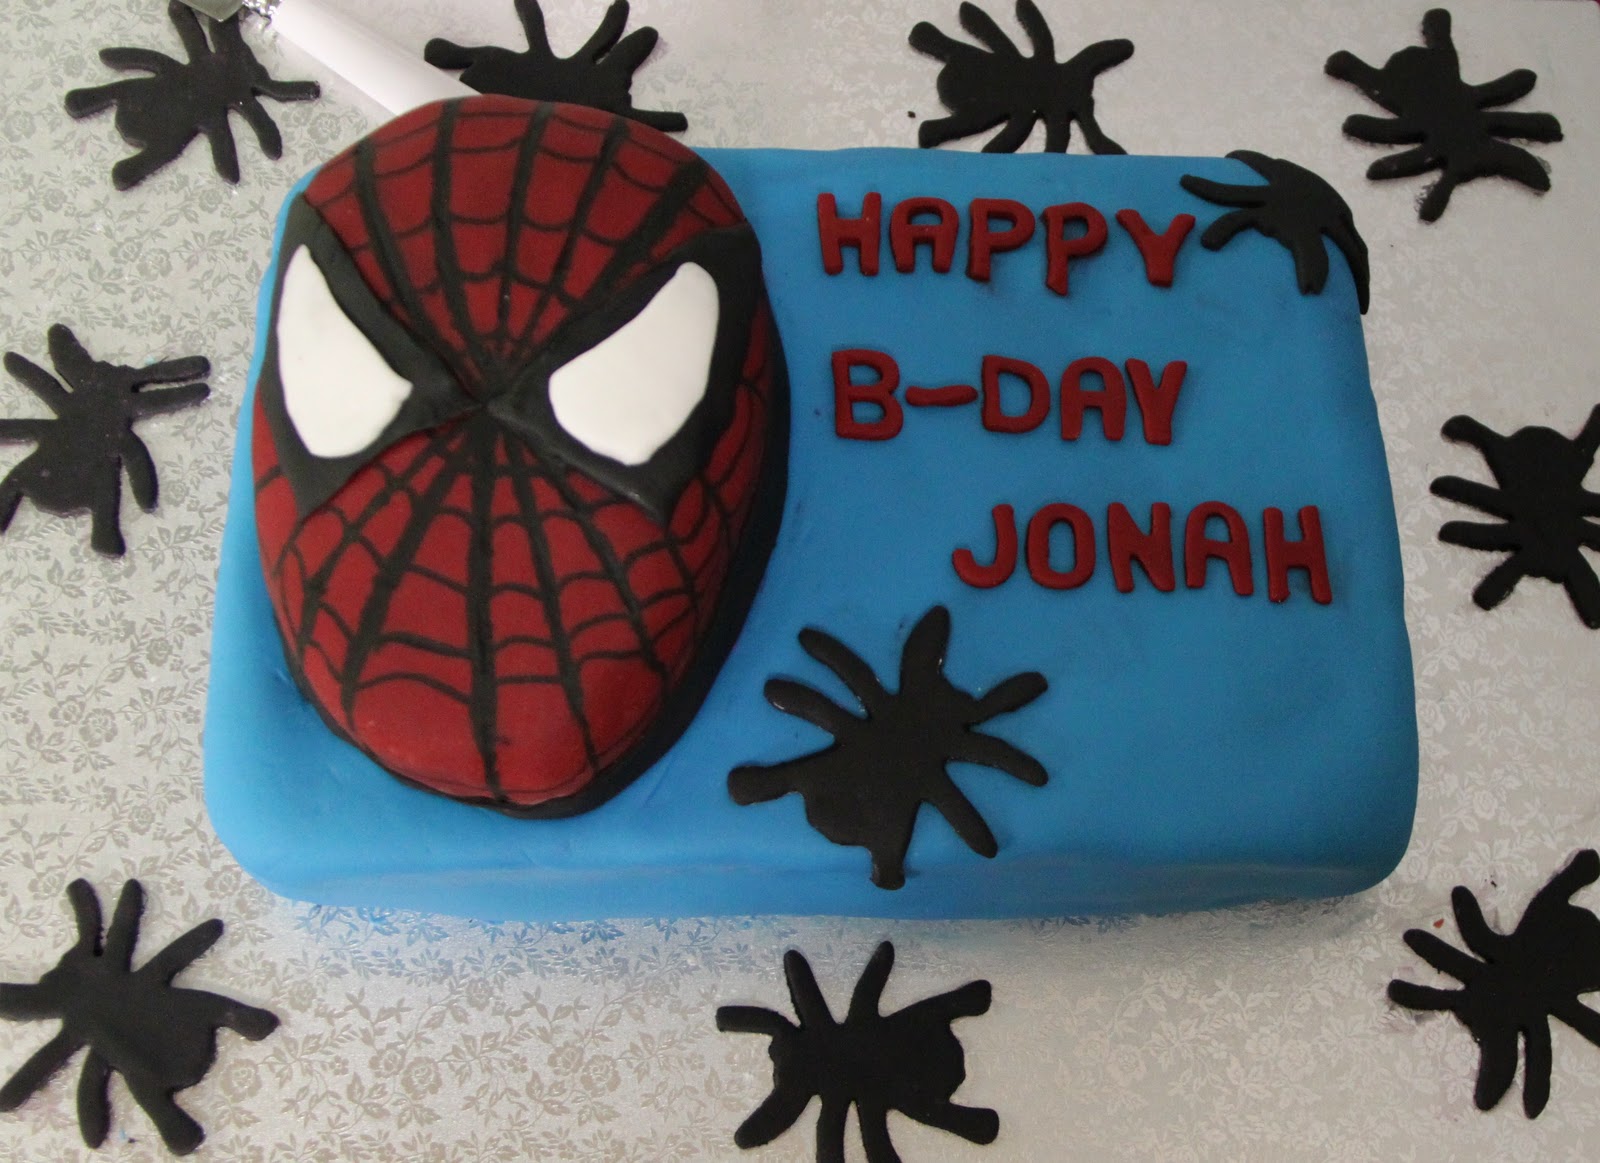
    Happy "Super" Birthday!

    Just wanted to share a picture of a cake made over the weekend for my nephews 5th birthday!!!

    Happy birthday Jonah! I love you!

    Friday, March 2, 2012

    Nutella Hot Chocolate

    The other night, while curling up on the couch I was in the mood for hot chocolate, but I wanted to mix it up a bit. When I opened my pantry and saw a jar of Nutella (my ultimate addiction) I knew exactly what I had to do. In a small saucepan, I added a cup of milk (I used skim, so that makes it healthy right?). I brought the milk to a gentle simmer and then whisked in about 1 Tbsp. of Nutella until it was melted and combined with the milk. I poured the mixture into a mug and topped with some mini marshmallows (whipped cream would be perfect too). It was just so delicious I had to share. This is a DEFINITE must try! ENJOY!

    Wednesday, February 29, 2012

    Jamie Oliver's Meals in Minutes: Pregnant Jooles's Pasta, Crunchy Red Endive and Watercress Salad

    Last night was the second of my Jamie Oliver's Meals in Minutes cookbook test.

    On the menu:
    • Pregnant Jools's Pasta (essentially pasta with meat sauce)
    • Crunchy Red Endive and Watercress Salad (I used baby arugula which the book gave as an option)
    I pretty much followed the recipe exactly except for a few simple swap outs. I changed the type of pasta from penne to farfalle (bowties) and instead of using sausages in the sauce I used ground veal. The recipe in the book included a dessert (little frangipan tarts) but since we try to eat somewhat healthy during the week I decided to skip it. The tarts looked and sounded delicious so I will probably test the recipe out on the weekend and bring them to a friend's house.

    Here are my thoughts:

    Ingredients: Just like last time all the ingredients were easy to find in my local supermarket. Besides being incredibly easy to find the ingredients were also very reasonable. My whole bill for this meal cost just over $20.

    Method: This time around, the method was a little tougher than last time. This was partly my fault since I skipped the dessert. Because of this, I had to skip the steps based around the tarts and often found myself losing my spot on the page. Other than that, this recipe was easy to follow. My only other complaint was that the recipe called for the meat to be cooked on a high heat, I found for the time given to cook the meat I had to turn the temperature down a bit about halfway through the cooking time as my sauce was starting to burn but like any recipe you have to pay attention and adjust accordingly.

    Cook Time: This meal was even quicker than the last one. I had dinner on the table in just under 30 minutes! In fact, when I called Jordan to the table his response was "What??? Already???"! Granted, I skipped the whole dessert section of the recipe but if you included it it would probably only add about 10-15 minutes to the cook time.

    The Food: Once again, DELICIOUS! The meat sauce tasted like it had  been cooked all day and was the perfect comfort food for a cold winter's night. The salad was fresh and crunchy and was the perfect accompaniment for the pasta. Another satisfying meal from Mr. Jamie Oliver!

    Tonight I am cooking my own recipe so make sure to check back tomorrow for a post on:
    • Roasted Herb Chicken
    • Caramelized Shallot Gravy and
    • Shaved, Roasted Brussel Sprouts

    Wednesday, February 15, 2012

    Product Review: Valentine's Day Whoopie Pies

    I hope everyone had a wonderful Valentine's Day yesterday full of love, chocolate and candy!

    I spent the evening working a Couple's Cooking class but wanted to leave Jordan a little Valentine's Day treat for when he got home. Since I didn't have much time in the morning before I had to head to work I turned to the help of a boxed mix.

    I decided whoopie pies were the way to go and so I went with this mix:
    Click here for info.
    I added my own twist on the mix by using a piping bag to make the whoopie pies into a heart shape and then using food dye to make the icing a lovely hot pink. Overall I was very satisfied with this product. The baking time was a little off, but I think that is because I piped the hearts larger than the size directed on the box. Jordan was satisfied with the mix too, which I was able to tell by the crumbs left on the plate when I got home This was definitley a great boxed mix perfect for whipping up a quick and delicious sweet treat!


    Tuesday, November 29, 2011

    Monkeying Around

    Check out these cupcakes I made for my nephews 1st birthday this past weekend!

    I got the idea from here but altered it a little bit. I used half of a vanilla wafer for each of the ears instead of a whole one and instead of piping on the face and eyes with icing I used a black food marker.

    How cute are they? (sorry it is not the best pic, I took it with my phone)

    Monday, October 17, 2011

    Sesame Street Cake Pops

    One of my nephews turned two a few weeks ago. He loves Elmo (or "Melmo" as he calls him) so I decided to make him some Elmo cake pops to celebrate.

    I followed the basic instructions from the amazing Bakerella's post here but slightly changed things up a bit.

    For the eyes instead of the white candy that she used I found candy googly eyes from Wilton at Bulk Barn, you can also purchase them here.

    For the nose Bakerella used a whole orange jelly bean. I found it easier to cut the jelly bean in half lengthwise creating a flat and sticky surface to stick the nose on with. If you are going to make these at home make sure to buy smaller jelly beans (like Jelly Belly).

    For the fur, Bakerella used a method of using a toothpick to paint the fur on using the candy melts. I found it a little less time consuming to use red sprinkles for the fur. I used the same method and order as Bakerella but when she painted I sprinkled the pops with the sprinkles.

    A few days after my nephews birthday I got a call from a friend of my sister-in-law's who asked me if I could make some Elmo cake pops for birthday party she was throwing for her daughters. As well as Elmo she wanted some Cookie Monster pops as well. The method for Cookie Monster was the same, but he didn't have a nose and I used half of a mini chocolate chip cookie instead of the mouth.

    Here is how everything turned out:

    Friday, August 26, 2011

    Best Cookies Ever!!!

    This cookie recipe is based on one that I have used at work, I am not sure where it came from but it is too good not to share. I used Skor bits for this past batch but you can change it up to chocolate chips, white chocolate chips or whatever you heart desires. These cookies are perfectly soft and buttery but still get that crispy edge. Try them and I promise you wont be disappointed.

    Best Cookies Ever
    Makes about 2 dozen
    • 2 cups all purpose flour
    • 1 tsp salt
    • 1 tsp baking soda
    • 2 sticks unsalted butter
    • 1 cup brown sugar
    • 3/4 cup white sugar
    • 1 tsp vanilla extract
    • 2 Tbsp. water
    • 1 egg
    • 2 cups Skor bits  (or just dump in the whole bag like I did)
    1. Preheat your oven to 375 degrees F.
    2. In a large mixing bowl whisk together flour, salt and baking soda. Set aside.
    3. In the bowl of a stand mixer, using the paddle attachment, cream the butter and both sugars together until creamy and smooth. Add vanilla, water and the egg and continue to mix until combined.
    4. With the mixer on low speed, add the flour mixture a little bit at a time until completely combined. Turn the mixer off, remove the bowl and stir in the Skor bits (or whatever you are using).
    5. Using a teaspoon or a small ice cream scoop, place rounds of the cookie dough onto a parchment lined baking sheet spacing the cookies about 1 inch apart.
    6. Place in the oven and bake until light golden brown, about 10-12 minutes.
    7. Remove from oven and allow to cool on a baking rack (or eat while still warm like I do!)


      Wednesday, July 27, 2011

      Fruity and Refreshing Ice Pops!!!

      The other night I took my new Zoku Ice Pop Maker for a spin using some delicious raspberries from my garden. I made six ice pops in two different flavours, both featuring the freshly picked berries; Raspberry-Lime and Raspberry-Kiwi!


      For the first flavour I prepared some homemade limeade. I combined 1/2 cup of water with 1/2 cup of sugar in a small saucepot to create a simple syrup. I placed the pot over medium-low heat and heated until the sugar was dissolved. I then combined the sugar mixture with 1/2 cup of fresh lime juice and 2 cups of ice cold water. Once I had my limeade prepared, I stuck some whole raspberries onto the wall of my ice pop maker, then proceeded to pour in my limeade and waited until they froze.

      For the second flavour, I pureed 1 cup of raspberries with 1 sliced kiwi and 1 cup of water and about one Tbsp. of sugar (the amount of sugar will depend on the sweetness of your fruit).I then passed the puree through a strainer and let it chill. I then lined my ice pop maker with some freshly sliced kiwis before pouring in the fruit puree.

      If you don't have one of these fantastic little gadgets, you can use traditional ice pop molds and wait for them to freeze overnight.

      Look how pretty they look! They were also delicious and perfect for a warm summer night!


      This new gadget is certainly helping me to get in my daily fruit servings and offers a healthier summer time snack then ice cream!!! I can't wait for the next round.....

      Wednesday, June 29, 2011

      I Scream, You Scream.....

      My sister-in-law just graduated from school as a Doctor of Chiropractic. To celebrate the occasion my in-laws threw a fabulous party. Most of the party was catered but my mother-in-law asked me to help out with the dessert table.

      Inspired by a post by Amy Atlas (here), we decided to put together an ice cream sundae bar. We got various ice cream flavours, and stored them in large ice buckets and then filled a table with various glass vessels full of toppings that included: chocolate sauce, sprinkles, cookies, candies and much, much more!

      In addition to the ice cream I wanted to make another little treat. Inspired by my previous post (here) and Bakerella's post (here) I decided to make Ice Cream Cone Cake Pops. They were SUPER cute!

      Check them out:


      The party was so much fun and the dessert was a HUGE hit! Congrats Deb!!!

      Wednesday, June 15, 2011

      Strawberry Macarons

      This past weekend my friend asked me to make some macarons for a bridal shower she was throwing. Macarons can be very temperamental but I was very happy with the way they turned out. 

      Last night, after flipping through the channels only to find nothing interesting on TV, I headed into the kitchen and decided to make a batch for myself with the leftover ingredients. Inspired by the bright pink peonies I picked from my garden a few days ago, I went with a pink cookie with a strawberry frosting for the center.

      For the cookies I used Bakerella's recipe found here.

      For the filling I made a delicious, yet rich strawberry frosting. Here is the recipe:

      Strawberry Frosting (For cookies, cakes, cupcakes and eating off a spoon)
      Makes about 2 cups
      • 1 stick (1/2 cup) butter, at room temperature
      • 2 Tbsp. good quality strawberry preserves
      • 1- 1.5 cups icing sugar 
      1. Place the butter in the bowl of a stand mixer with a paddle attachment and mix until fluffy.
      2. Stop the machine and add the preserves. Mix until combined.
      3. Turn the machine to low, and while running, slowly add the icing sugar, 1/2 cup at a time until desired consistency is achieved. The more sugar you add the more dense the frosting. 
      4. Turn the machine to high and mix for another minute until fluffy. 

      Tuesday, June 7, 2011

      How-To: Oreo Pops!

      Desserts on a stick are the newest trend, and one that I LOVE! Oreo pops are a new one that I have seen popping up around the blog world. This weekend my sis-in law and I decided to whip some up. They were super quick and easy and only required 3 ingredients. *Please note: doubled stuffed Oreos work the best but we also experimented with some Fudgee-O's which were equally delicious!

      Check out this quick how-to:

      1. Take a lollipop stick or skewer and push it through the cream center of an Oreo cookie, making sure to only go 3/4 of the way up.

      2. Melt some chocolate (we used white).  Using a spoon to help, cover the cookie with the melted chocolate.

      3. Place on a parchment lined baking sheet and sprinkle with sprinkles or any other decoration of your choice.

      4. Repeat with the remaining Oreos and place in the fridge to harden.

      5. ENJOY!

      click to enlarge

      Tuesday, April 5, 2011

      "You Can't Beat a Babka!"

      For those of you who are Seinfeld fans you will know what I am talking about when I say "you can't beat a babka". It was my Mom's birthday this weekend so my family gathered for a celebratory brunch. My mom requested a French Toast Casserole  but I wanted to bring something else as well. Instead of heading out to a bakery only to be left with a cinnamon babka with a hair on it like Jerry and Elaine I decided to make my own chocolate babka. I found a great recipe from Martha Stewart and went to work. The best part was that the recipe makes 3 loaves and the loaves can be frozen prior to baking, so now I have a couple of babkas in my freezer ready to go for a last minute event.

      This babka was delicious!!! It was super chocolaty and the streusel topping finished it off perfectly. If you have a free afternoon, I highly recommend getting in the kitchen to make some of this chocolate babka!

      Find the recipe here: http://www.marthastewart.com/312994/chocolate-babka

      Deb, from Smitten Kitchen also attempted the recipe, which you can find here: http://smittenkitchen.com/2007/09/mmm-bab-bee-bab-ka/ , her post includes some pictures which helped make the recipe a little easier.

      Sunday, March 27, 2011

      Spider-man Cake!

      My nephew Jonah turned 4 this weekend! This year he requested a Spider-Man cake.

      Here are a few pictures I took during the making of the cake and the end result:


      HAPPY BIRTHDAY JONAH! I LOVE YOU!!!

      Sunday, February 20, 2011

      Whoopie Pies

      Lately, it seems that everywhere I look I see Whoopie Pies! At first I wondered "what the heck is a whoopie pie?". After some research, I found out that Whoopie Pies are just a creamy filling sandwiched between cake like cookies and they are becoming super trendy.So now that I knew what all the hype was about, it was time for me to make my own. The flavour combinations are endless, and I had a really hard time deciding what flavour to make when I noticed the dozen clementines in a bowl on my kitchen counter. I decided on a clementine cake with a creamy clementine buttercream filling! They turned out great!!! After the success of these, I am ready to get back into the kitchen and try out some more. What flavour should I make next?

      Clementine Whoopie Pies
      Makes about 18 bite size pies
      For the Cake:
      • 1 cup (200 grams or 7 ounces) sugar
      • 1 cup (2 sticks) butter
      • zest and juice from 2 clementines
      • ½ cup buttermilk
      • 2 cups all-purpose flour
      • 1 1/2 teaspoons baking powder
      • 1/4 teaspoon baking soda
      • 1/4 teaspoon salt
      For the icing:
      • 1 cup (2 sticks)
      • 3 cups icing sugar
      • Juice and zest from 1 clementine
      • 1 tsp. vanilla

      1. Pre-heat oven to 350 degrees F.
      2. In a small bowl sift together flour, baking powder, baking soda and salt, set aside. In a measuring cup, place juice of clementines (you should have about ¼ cup) combine with buttermilk, set aside.
      3. Using a stand or hand mixer cream together butter, sugar and zest. Mix in half of the flour mixture, followed by half of the buttermilk mixture. Repeat. Mix until thoroughly combined but don’t over mix.
      4. Using a mini ice cream scoop, scoop the batter into rounds onto a parchment lined baking sheet.
      5. Place the tray in the oven and bake until set, about 12 minutes.
      6. Remove the cakes from the oven and let cool.
      7. While cooling, prepare the icing. Beat the butter until fluffy, continue mixing while adding in the icing sugar. Mix until combined then mix in the zest, juice and vanilla. Place the icing into a piping bag.
      8. Once the cakes are cool, flip them over so the flat side is facing up. Pipe some icing onto one cake and top with another. Repeat with remaining cakes and icing. 


        Friday, February 11, 2011

        Pretty in Pink Valentine's Marshmallows

        Who doesn't love marshmallows? I know I do, and I have always wanted to try to make my own. I thought Valentine's Day would be the perfect time so I whipped up a batch and dyed them pink for the occasion. These marshmallows will be great dipped in chocolate or with a steaming cup of hot cocoa!

        Homemade Marshmallows
        Recipe Courtesy of Martha Stewart
        • 3 packets unflavoured gelatin (1/4 oz./7g each)
        • 1/2 cup plus 1/4 cup cold water
        • 2 cups granulated sugar
        • 2/3 cup light corn syrup
        • 1/4 tsp. salt
        • 1 tsp. vanilla extract (to mix it up, replace the vanilla with another flavour or extract)
        • few drops of food colouring of choice ( I used Wilton gel food colouring)
        • non-stick cooking spray
        • icing sugar
        1.  Lightly spray a 9-by-9 inch baking pan with cooking spray.
        2. In the bowl of an electric mixer, fitted with a whisk attachment, sprinkle gelatin over 1/2 cup cold water. Let stand for 10 minutes.
        3. In a medium saucepan, combine sugar, corn syrup, and 1/4 cup water. Place saucepan over medium-high heat and bring to a boil. Boil rapidly for 1 minute. Remove from and heat.
        4. With the mixer on high, slowly pour the boiling syrup into the gelatin mixture. Add salt and continue mixing for 12 minutes.
        5. Add the vanilla beans and food colouring, mix well until combined.
        6. Spray a rubber spatula with cooking spray. Spread the marshmallow mixture evenly into the prepared pan with the sprayed spatula. Spray a sheet of plastic wrap with cooking spray, and place, spray side down, on top of the marshmallows. Let stand for 2 hours.
        7. Carefully remove the marshmallows from the pan. Remove the plastic wrap and discard. Cut marshmallows into 2-inch squares using a sharp knife, sprayed with cooking spray.
        8. Place icing sugar into a large bowl. Add the marshmallows into the bowl and toss to coat (you may have to work in batches).
        9. The marshmallows can be stored in an airtight container for up to 3 days. 


        Saturday, February 5, 2011

        Resse's Peanut Butter Cup Brownie Bars

        When it comes to junk food, I am not a huge chocolate eater, I would usually rather a bag of chips, BUT I have a huge weakness for Reese's Peanut Butter Cups. When I saw the blog post here, I immediately started drooling. The next day, I picked up all the necessary ingredients and got to work as soon as I got home. The result....

        AMAZING! It is a good thing I promised to bring them to a party, or I would have eaten the whole tray.

        I followed the recipe exactly, and wouldn't change anything!!!

        ENJOY!!!

        Saturday, December 19, 2009

        How-to: Ice Cream Cone Cupcakes

        Looks like a delicious ice cream cone, right? WRONG! What would you say if I told you that that cone is filled with chocolate cake, and that "ice cream" is really vanilla icing? I know what I would say; YUM!

        Here is how to make these deliciously cute ice cream cone cupcakes:

        1. Place flat bottom ice cream cones in a lasagna pan or casserole dish. The raised edges help the cones from falling over.


        2. Prepare your favorite cake batter and pour into the cones, only filling the neck of the cones.


        3. Place in a 350 degree F oven and bake until a skewer place in the centre of a cone comes out clean, about 40 minutes. Remove from the oven and let cool.


        4. Once cooled, spread your favourite icing on each cone to represent the ice cream and then top with your favorite ice cream toppings. Be creative!!!

        ENJOY!

        Saturday, November 28, 2009

        Macaroon Challenge

        A few months ago, my parents went on vacation to Paris. Knowing me well, all the gifts they brought back for me were ones I could eat. One of my favorites was the beautifully decorated box from Laduree filled with eight, delicate, delicious, Parisian macaroons (or macarons, if I were French); smooth, flavourful filling sandwiched between two delicate, melt in your mouth almond meringue cookies. I had tried French style macaroons before, but none had tasted like these.

        www.laduree.fr

         Doing some research on the internet I combined a few recipes, to try to duplicate these cookies, so here lies THE MACAROON CHALLENGE!!!! I decided to start small and just try the most basic flavour, a vanilla cookie with vanilla buttercream filling. I decided to throw in some food colouring, just to make them look a little bit more interesting.

        Here is the recipe I used:

        Macaroons
        • 1 3/4 Cup icing sugar
        • 1 1/2 Cups almond flour or finely ground blanched and peeled almonds
        • 3 large egg whites
        • pinch of salt
        • 1/4 Cup granulated sugar 
        • 1/4 tsp. vanilla extract
        • food colouring (optional)
        Buttercream Filling
        • 1/2 stick (1/4 cup) butter, at room temperature
        • 1 Cups icing sugar, sifted
        • 1/2 tsp. vanilla extract 
        • 1 Tbsp. Heavy Cream
        • food colouring (optional)
         
        1. Preheat the oven to 300 degrees F.
        2. Line a large baking sheet with parchment paper, using a permanent marker trace circles onto the paper, using something the size you want your macaroons to be, then flip the paper making sure you can still see the circles.
        3. Sift icing sugar and almond flour into a small mixing bowl, and whisk to combine.
        4. In a large mixing bowl beat egg whites with an electric mixer on medium speed until foamy, add the salt and continue to mix while gradually adding the granulated sugar. Continue to beat until the egg whites form medium peaks.
        5. Using a rubber spatula, gently fold the almond mixture, vanilla extract and food colouring (if using) into the egg whites until just combined. Tap the bottom of the bowl on the counter to get rid of any air bubbles.
        6. Transfer the mixture into a large piping bag, with a medium sized plain tip. Pipe the mixture into the traced circles on the baking sheet.
        7. Place in the oven and bake until the macaroons become slightly firm on the top and can be lifted off the parchment paper, about 20 to 25 minutes. The bottoms of the macaroons should be completely dry.
        8. While the macaroons are baking, prepare the buttercream.
        9. In a medium mixing bowl, beat the butter with an electric mixer on medium speed until fluffy, add the vanilla then gradually mix in the icing sugar until combined, occasionally scraping the sides of the bowl with a rubber spatula. Add the cream then increase speed to high and continue to beat until icing is fluffy, about 3 minutes. Tint with food colouring if using.
        10. remove the macaroons from the oven and let cool on the baking sheet for about five minutes, before lifting the entire parchment onto a wire rack to cool completely.
        11. Once completely cool, spread about 1 tsp. of the buttercream mixture onto the flat side of one macaroon, and then sandwich with another macaroon.
        12. Macaroons can be stored for about 3 days in an airtight container in the refrigerator.

        Here is how my macaroons turned out:


        Generally, the cookies turned out pretty close to the ones I had from Laduree. Obviously, nothing is as good as the orginal, but these are lot easier then flying to Paris. I just have to practice my piping to get them into perfect circles. I'm looking forward to trying out some different flavours. Stay tuned.....


        Related Posts Plugin for WordPress, Blogger...