Recent Posts

Showing posts with label Rice and Pasta. Show all posts

Thursday, October 11, 2012

Seared Scallops with Sweet Corn Risotto

Clearly you can tell by my lack of posting that it has been awhile since I have cooked. Well last night, I actually had the energy to prepare some dinner so I decided to go all out with something a little fancier than a regular weeknight meal.

Jordan and I love scallops but we usually have them with a light sauce as an appetizer. Since I wanted to prepare them as a main I needed an accompaniment that would round out the meal. Scallops and corn make a perfect couple so I decided to pair the simply seared scallops with a delicious sweet corn risotto. It was a perfect, indulgent weeknight meal and I am glad I mustered up the energy to prepare it.

Sweet Corn Risotto
Serves 4
  • 2 Tbsp. olive oil
  • 1 shallot, minced
  • 1 clove of garlic, minced
  • 1 cup arborio rice
  • 1 cup white wine
  • 4 cups chicken or vegetable stock, heated
  • 1 cup of corn, fresh or frozen, pureed until almost smooth
  • 1 cup of corn niblets, fresh or frozen
  • 2 Tbsp. butter
  • kosher salt and freshly ground pepper
  • handful of chopped chives
  1. Heat a large skillet over medium-high heat, once hot add the oil, shallot and garlic. Cook until softned and translucnet, about 3 minutes. Stir in the rice and stir to coat with the oil. Cook for one minute.
  2. Pour in the wine, and using a wooden spoon scrape off any brown bits from the bottom of the pan. Bring to a boil, and reduce by one half. Lower the heat to a simmer
  3. Pour one ladle of stock into the rice mixture, and continually stir, once the liquid is absorbed add another ladle of stock. Repeat this process until all the stock is used and the rice is cooked to al dente, adding in both the pureed and whole corn with the last stock addition.
  4. Stir in the butter and season with salt and pepper to taste. Stir in the chives and cover with aluminum foil to keep in the heat while you sear the scallops.
Simple Seared Scallops
This recipe can be used for any amount of scallops
  • fresh, sea scallops
  • paper towel
  • kosher salt and pepper
  • vegetable oil
  • butter
  • squeeze of lemon
  1. Place the sea scallops onto a peice of paper towl and blot out any excess moisture. Season with salt and pepper.
  2. Heat a large saute pan over high heat, once hot add enough vegetable oil to coat the bottom of the pan. Add the scallops, making sure not to over crowd the pan and sear until golden brown on each side, about 2-3 minutes per side.
  3. Once finished, add a small amount of butter and a squeeze of lemon juice to the pan and let melt and coat the scallops.
  4. Remove and serve. 

Tuesday, August 28, 2012

Heading South

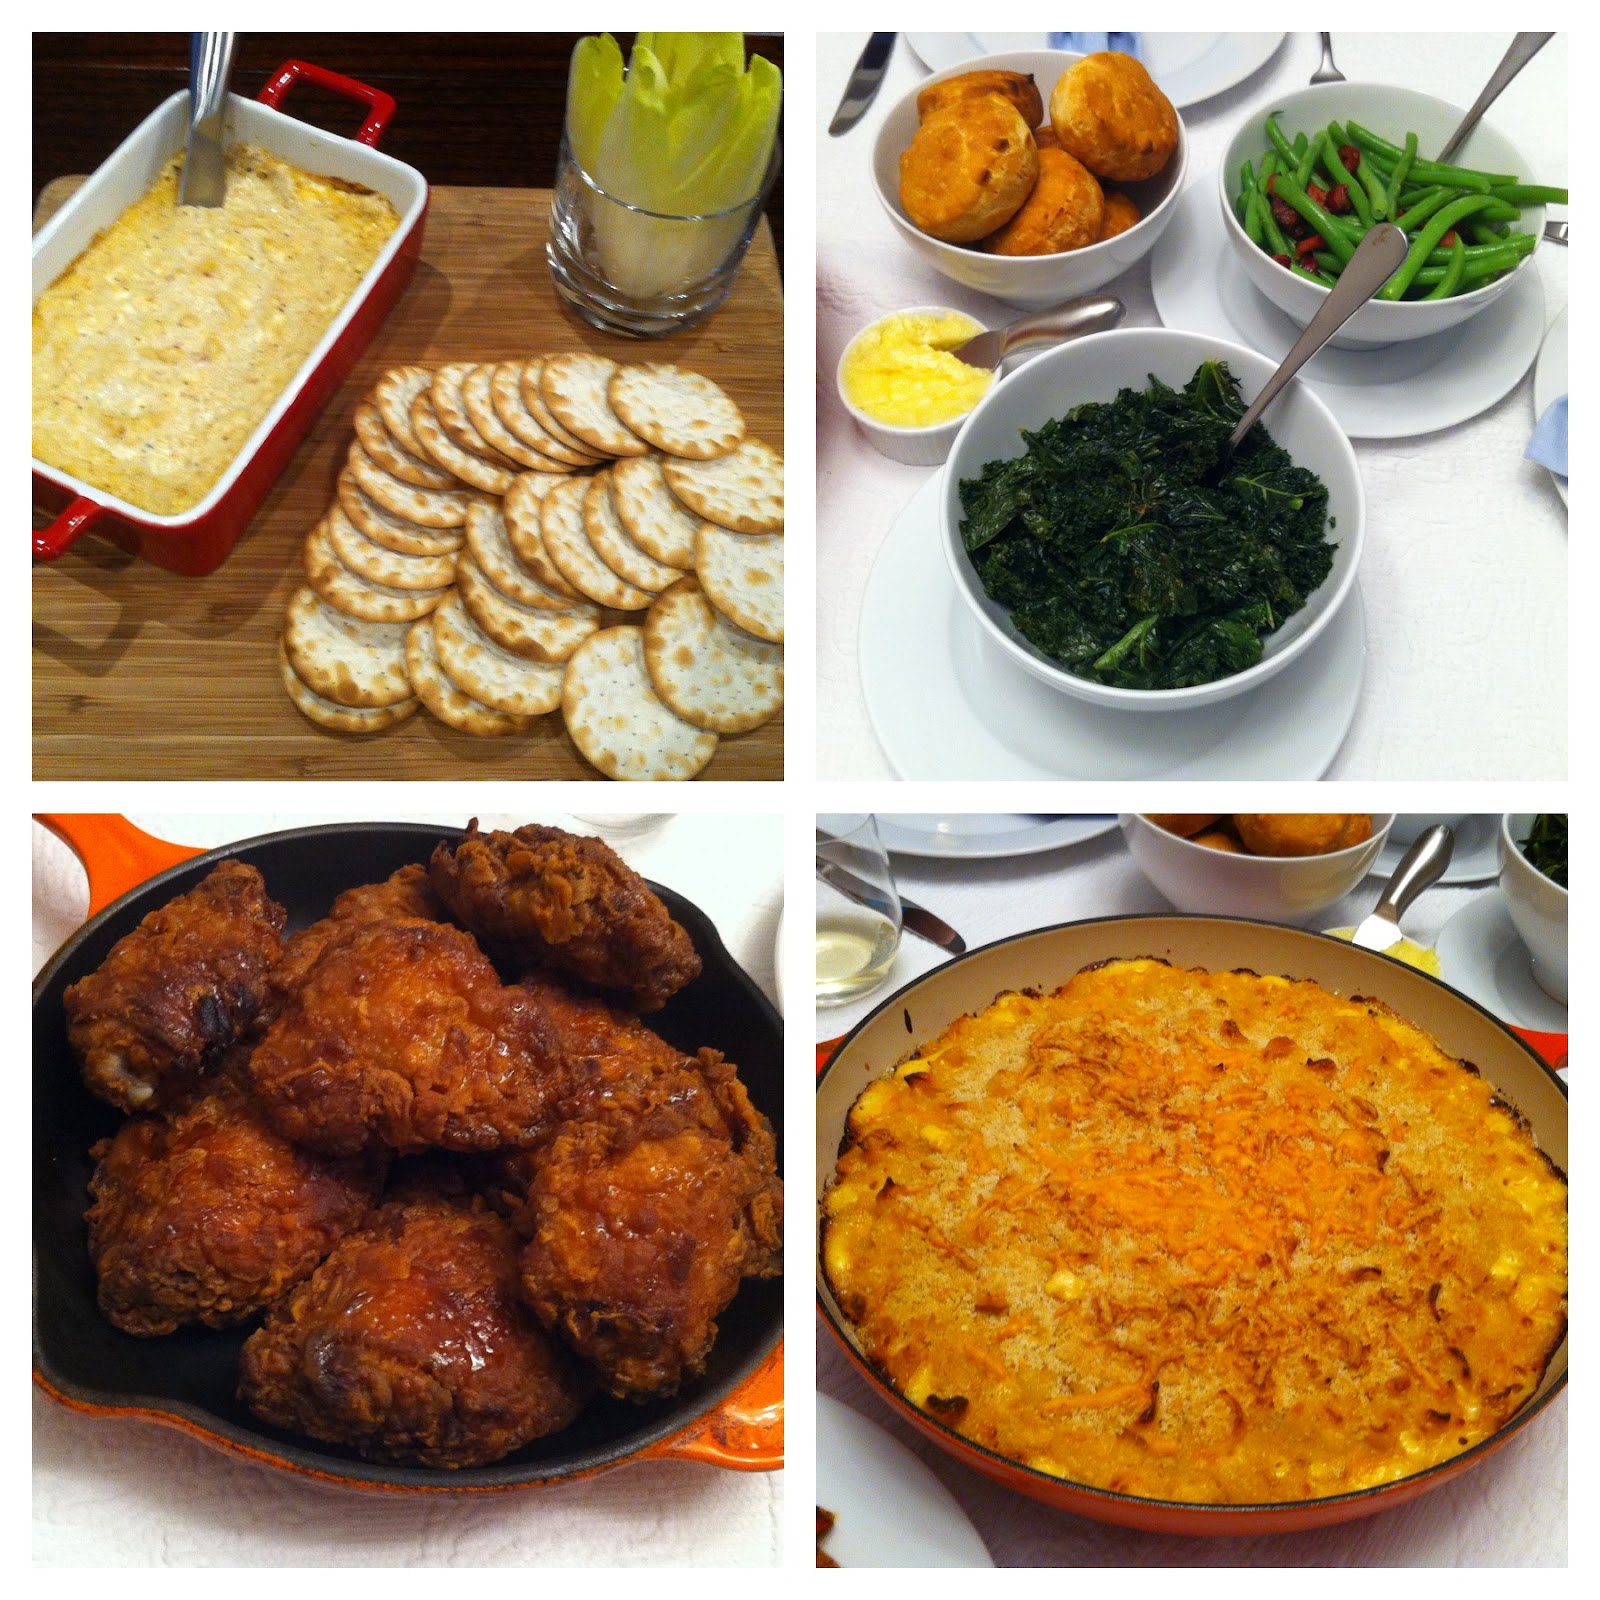
Years ago, my closest girlfriends and I started the tradition of hosting girls night dinner parties as often as we could. These dinners started off as a monthly event but as we get older and our lives started to change with houses, weddings, children, etc the dinners have become more and more sparse.  I think the last girls dinner I hosted my friend Ainsley was pregnant and her son is now 1! When I was able to gather my friends for one of the only quiet weekends of the summer I jumped at the opportunity to  host a dinner party. Inspired by a recent visit to Yardbird Southern Table in South Beach I developed a southern style menu and served everything family style for a casual feel.

On the Menu:
  • Blackberry-Ginger Lemonade
  • Creole Crab Dip with Crackers and Endive for Dipping
  • Southern Fried Chicken
  • Old Bay Blackened Shrimp
  • Mac and Cheese
  • Green Beans with Crispy Andouille Sausage
  • Sauteed Kale with Garlic
  • Biscuits with Honey Butter

The night was a success and hopefully we wont have to wait quite as long for another girls night dinner!

Here are a couple of the recipes from the evening as well as some pictures:

Creole Crab Dip
Serves 4-6
  • 1 can (120 g) lump crab meat, picked through for shells and cartilage
  • 1 small shallot, minced
  • 1/2 cup mayonaisse
  • 1/2 cup cream cheese, room temperature
  • 1 tsp. Old Bay seasoning
  • 1/2 tsp. Worcestershire sauce
  • squeeze of lemon juice
  • kosher salt and fresh ground pepper to taste
  1. Preheat the oven to 400 degrees F.
  2. In a mixing bowl combine the crab, shallot, mayo, cream cheese, Old Bay, Worcestershire and lemon juice. Season with salt and pepper to taste.
  3. Transfer the mixture to an oven proof dish and place in the oven.
  4. Bake until the top is golden and bubbly, about 15-20 minutes.
  5. Serve with your favourite crudite and crackers.
The Best Mac and Cheese
Serves 4 as a main
  • 1 lb. of elbow macaroni, or any other similar sized pasta (I used shells)
  • drizzle of olive oil
  • 4 Tbsp. butter
  • 1 shallot, minced
  • 1/4 cup. flour
  • 2 cups whole milk
  • 1 1/2 cups heavy cream
  • 1 cup velveeta cheese, cut into cubes
  • 3 cups grated sharp cheddar cheese
  • 1 tsp. paprika
  • 1 tsp. dry mustard 
  • dash of hot sauce
  • 1/2 cup Panko bread crumbs
  • salt and freshly ground pepper to taste
  1. Preheat the oven to 400 degrees F.
  2. In a large pot of boiling, salted water cook the pasta according to package directions. Drain, toss with the olive oil and set aside.
  3. In a medium saucepan, melt the butter over medium heat. Add the shallot and cook until softned, about 3 minutes. Stir in the flour and cook for 1 minute. Whisk in the milk and cream and continue to whisk until no clumps are present. Cook until the mixture begins to boil and is thickened then whisk in the cheeses.
  4. Once the cheese is melted, stir in the paprika, dry mustard and hot sauce then season with salt and pepper to taste.
  5. Pour the sauce over the pasta and stir to combine.
  6. Empty the pasta into a greased oven-proof casserole dish then sprinkle the top with the bread crumbs.
  7. Place in the oven and bake until bubbly and the crust is golden, about 20 minutes.


Wednesday, February 29, 2012

Jamie Oliver's Meals in Minutes: Pregnant Jooles's Pasta, Crunchy Red Endive and Watercress Salad

Last night was the second of my Jamie Oliver's Meals in Minutes cookbook test.

On the menu:
  • Pregnant Jools's Pasta (essentially pasta with meat sauce)
  • Crunchy Red Endive and Watercress Salad (I used baby arugula which the book gave as an option)
I pretty much followed the recipe exactly except for a few simple swap outs. I changed the type of pasta from penne to farfalle (bowties) and instead of using sausages in the sauce I used ground veal. The recipe in the book included a dessert (little frangipan tarts) but since we try to eat somewhat healthy during the week I decided to skip it. The tarts looked and sounded delicious so I will probably test the recipe out on the weekend and bring them to a friend's house.

Here are my thoughts:

Ingredients: Just like last time all the ingredients were easy to find in my local supermarket. Besides being incredibly easy to find the ingredients were also very reasonable. My whole bill for this meal cost just over $20.

Method: This time around, the method was a little tougher than last time. This was partly my fault since I skipped the dessert. Because of this, I had to skip the steps based around the tarts and often found myself losing my spot on the page. Other than that, this recipe was easy to follow. My only other complaint was that the recipe called for the meat to be cooked on a high heat, I found for the time given to cook the meat I had to turn the temperature down a bit about halfway through the cooking time as my sauce was starting to burn but like any recipe you have to pay attention and adjust accordingly.

Cook Time: This meal was even quicker than the last one. I had dinner on the table in just under 30 minutes! In fact, when I called Jordan to the table his response was "What??? Already???"! Granted, I skipped the whole dessert section of the recipe but if you included it it would probably only add about 10-15 minutes to the cook time.

The Food: Once again, DELICIOUS! The meat sauce tasted like it had  been cooked all day and was the perfect comfort food for a cold winter's night. The salad was fresh and crunchy and was the perfect accompaniment for the pasta. Another satisfying meal from Mr. Jamie Oliver!

Tonight I am cooking my own recipe so make sure to check back tomorrow for a post on:
  • Roasted Herb Chicken
  • Caramelized Shallot Gravy and
  • Shaved, Roasted Brussel Sprouts

Thursday, February 23, 2012

Jamie Oliver's Meals in Minutes: Green Curry, Crispy Chicken, Kimchee Slaw and Rice Noodles

As discussed in my post the other day, for the next few weeks I am going to be putting Jamie Oliver's Meals in Minutes cookbook to the test.

The book is divided up into different complete meals (3-5 dishes each) so last night I decided to cook:
  • Green Curry
  • Crispy Chicken
  • Kimchee Slaw
  • Rice Noodles
You can find the recipe on Jamie's website here.

Here is what I thought of the recipe:

Ingredients: All the ingredients were easy to find in my local supermarket. There was nothing strange or unusual, in fact I had most of the ingredients in my fridge and pantry.

Method: The recipe is written as one long process instead of individual recipes for each dish. This is a super handy feature as it allows you to do many things at once and ensures that all the dishes will be ready at the same time. My only complaint was that because the recipe was written this way, I didn't have much time to clean as I went (one of the number one rules taught in culinary school) so I (and by "I" I really mean Jordan) was left with a sink full of pots, pans, utensils and appliances.

Cook Time: This book definitley delivered on it's title. I got home from work at around 6:30 and Jordan and I were sitting and eating ALL the dishes at just past 7pm. Granted, I have a lot of experience in the kitchen, but  the everyday home chef can definitley complete this recipe in 30-45 minutes.

The Food: First of all, the chicken was AMAZING! It was perfectly crispy on the outside but still juicy on the inside. The honey and green curry paste added a delicious sweet, slightly spicy and sticky glaze that had Jordan and I licking our fingers and plates. The green beans and slaw were delicious as well. We probably could have done without the rice noodles as the three other dishes were enough to fill us, but they came in handy to soak up leftover green curry sauce from the beans.

Overall, I was very satisfied with my first meal from this book and am looking forward to the next. Thanks Jamie!

Friday, April 15, 2011

Ravioli with Sweet Corn, Leeks and Bacon

With its bright colours and light sauce this pasta dish is a delicious way to welcome spring!!!

This sauce goes great with fresh Fettuccine as well.

Ravioli with Sweet Corn, Leeks and Bacon
Serves 4
  • 4 ears of corn, shucked, kernels removed
  • 1 cup vegetable broth
  • 1/4 cup cream
  • 4 slices of bacon, chopped
  • 2 leeks, sliced
  • 2 cloves of garlic, minced
  • 2 sprigs of thyme, leaves removed and roughly chopped
  • 1 red pepper, diced
  • 1 lb. package of ricotta and spinach ravioli
  • Kosher salt and freshly ground pepper
  • Hot sauce to taste
  • ½ cup flat leaf parsley, chopped
  • Freshly grated Parmesan cheese
  1. Bring a pot of salted water to a boil.
  2. In the meantime, in a blender or food processor combine 1 cup of the corn kernels with the broth and cream. Blend until combined and set aside.
  3. Heat a large sauté pan over medium high heat, add the bacon and cook until just starting to crisp. Add the leeks, garlic and thyme. Cook until softened and the leeks are lightly brown, about 3 minutes.
  4. Stir in the red pepper and remaining cornand cook until pepper is soft and corn is cooked through about 3-5 minutes. Pour in the broth mixture, stirring to combine. Lower heat and let simmer while you cook the pasta.
  5. Cook the pasta in the boiling water according to package directions, drain and set aside.
  6. Check the seasoning of the sauce and adjust with salt, pepper and hot sauce, stir in parsley. Toss the seasoned sauce with the drained pasta and top freshly grated Parmesan cheese before serving.

    ENJOY!

      Thursday, April 7, 2011

      Weekday Cooking: Peanut Chicken Stir Fry

      I had a friend ask me the other day how she can make the process of making dinner during the week easier. Like a lot of us she was having a hard time getting home from work at 6pm and then having to come up with a delicious and hot dinner in a reasonable amount of time. The key to being able to cook fast is to plan ahead. I know it is easier said then done but if you can plan your meals at the beginning of the week and have all the ingredients available it will make the process much easier. A great weekday meal is stir fry. It is perfect because if you have time the night before, you can slice the protein, cut up all the veggies and have the sauce ready to go all in separate containers in the fridge. When you get home from work all you have to do is cook some rice and toss everything together in a pan.

      This stir fry is delicious and is very versatile. Feel free to switch up the chicken with anything you have on hand like beef, shrimp or tofu, and to add any veggies you want or have on hand.

      This stir fry is perfect with some steamed rice or noodles or as I made it tonight as a filling for lettuce wraps.

      Peanut Chicken Stir-Fry
      Serves 4
      • 2 tsp. cornstarch
      • 1 Tbsp. mirin (Japanese cooking wine, you can use sherry or any sweet wine you have)
      • 2 Tbsp. water
      • 1 Tbsp. soy sauce
      • 1 Tbsp. hoisin sauce
      • 2 Tbsp. oyster sauce (I used vegetarian oyster sauce)
      • 1 tsp. sesame oil
      • 1 tsp. sugar
      • 2 Tbsp. vegetable oil
      • 1 1/2 lbs. boneless, skinless chicken thighs or breasts, cut into small cubes
      • 1 tsp. minced ginger
      • 2 cloves of garlic, minced
      • 4 green onions, sliced
      • 1 red pepper, chopped
      • 1 cup shitake mushrooms, sliced
      • 1 (8oz) can, sliced bamboo shoots, rinsed and drained
      • 1 (8oz) can, sliced water chestnuts, rinsed and drained
      • 1 cup roasted peanuts
      1. In a small bowl whisk together cornstarch, mirin, water, soy sauce, hoisin sauce, oyster sauce, sesame oil and sugar. Set aside.
      2. Heat a wok or a large skillet over medium-high heat. Once hot add 1 Tbsp. of the oil and chicken and stir fry until almost cooked through, about 3 minutes. Remove from the pan and set aside.
      3. In the same pan add the remaining oil, ginger, garlic and onion and stir fry until softened and fragrant. Add the mushrooms, peppers, bamboo shoots, water chestnuts and peanuts and stir-fry for a minute longer. Add the chicken back into the pan and pour over the stir-fry sauce. Cook until the chicken is cooked through and sauce has thickened, about 2 minutes.
      4. Remove from heat and serve with steamed rice or wrap up in crisp iceberg lettuce leaves.

      Wednesday, December 9, 2009

      "What's For Dinner?" Wednesday: Butternut Squash Ravioli with Maple Brown Butter, Caramelized Onions, Sage and Walnuts

      Sounds fancy, huh? This recipe is actually super simple, seasonal and most importantly, DELICIOUS! This dish is a great weeknight, winter meal, that will warm you right up with many seasonal flavours, but it is also great for entertaining. Tonight I'm serving it as an entree with some salad and garlic bread, but it also makes a great appetizer on its own for an upcoming holiday dinner party.

      Butternut Squash Ravioli with Maple Brown Butter, Caramelized Onions, Sage and Walnuts
      Serves 4 as an entree with a salad

      •  1 tsp. olive oil
      • 1/2 sweet onion, finely chopped
      • 1 Tbsp. chopped sage
      • 1/3 cup unsalted butter
      • 1 Tbsp. pure maple syrup
      • 1/4 cup toasted walnuts, chopped
      • 1 1lb. package of store bought butternut squash ravioli
      • salt and pepper
      • Parmesan cheese
      1. Bring a pot of salted water to boil on the stove.
      2. Heat a large saute pan over medium heat, once hot add the oil, onions and sage. Cook, stirring occasionally until the onions are golden and starting to caramelize.
      3. Add in the butter and cook until the butter is melted and starts to become a golden brown colour, this will take a few minutes. Once the butter is browned, stir in the maple syrup and walnuts, let cook for another minute then take off the heat and season with salt and pepper.
      4. Prepare the pasta according to package directions.
      5. Re-heat the sauce over low heat, drain the pasta and toss with the sauce, garnish with some more chopped sage and Parmesan cheese and serve.

      Bon Appetit!

      * For a change, substitute the ravioli for gnocchi, or even better sweet potato gnocchi

      Wednesday, November 25, 2009

      "What's For Dinner?" Wednesday: Mexican Rice Bowl

      Rice bowls are becoming a very popular menu item at restaurants. I love the comforting feeling you get from eating your whole meal, in one steamy, hot bowl. My version of a Mexican Rice bowl, is a healthy and hearty weeknight meal, and the leftovers are great wrapped in a tortilla for lunch the next day. The fact that it is cooked in one pot also helps make it a speedy clean up.

      Mexican Rice Bowl
      Serves 4
      • 1 medium onion, chopped
      • 2 cloves of garlic, minced
      • 1 chorizo sausage, sliced into 1/4 inch rounds
      • 1 boneless, skinless chicken breast, cut into 1/2 inch slices
      • 1 cup long grain, white rice
      • 1/2 Tbsp. chili powder or Tex Mex seasoning
      • 1 can (341ml.) corn niblets
      • 1 can (540 ml.) black, pinto or kidney beans, drained and rinsed
      • 1 can (127ml.) green chilies, drained (found in the Mexican food aisle)
      • 1 can (796 ml.) chopped tomatoes with liquid
      • 1 1/2 cups chicken broth
      • grated cheese, sour cream and sliced green onions for garnish (optional)
      1. Heat a large saute pan over medium high heat, add the oil and cook the onions and garlic until softened, add in the chorizo and chicken and cook until the chicken no longer looks pink. Stir in the rice and chili powder and cook for 1 minute.
      2. Add in the rest of the ingredients, and stir to combine. Bring up to boil, then lower heat to medium-low, cover and let simmer, stirring occasionally, until the liquid is evaporated and the rice is cooked, about 15 minutes.
      3. Place into individual bowls, top with some grated cheese, sour cream and green onions.

      Olé!
        Related Posts Plugin for WordPress, Blogger...