Recent Posts

Showing posts with label Recipes. Show all posts

Wednesday, May 22, 2013

I am back and ready for summer!

I'm back! My readers may have noticed that I have been MIA for the past few months but it has been for a great reason. Jordan and I were busy taking care of the greatest thing to happen to us....our new baby boy. I am now totally into the swing of motherhood and ready to start cooking and blogging again.

To start off, I want to share a delicious summer recipe. Nothing says summer more than barbecue and nothing says barbecue more than ribs! These ribs are the perfect combination of smoky, spicy and sweet and because they are slow cooked in the oven before hitting the grill they are perfectly, fall off the bone tender. Serve them up with some grilled corn and vegetables and you have a delicious dinner.


Smoky, Sweet and Spicy Barbecue Ribs
Serves 4

Ingredients:
  • 2 racks of pork back ribs, about 3 lbs.
  • 2 Tbsp. paprika
  • 1 Tbsp. kosher salt
  • 1 Tbsp. garlic powder
  • 2 tsp. chipotle powder
  • ¼ cup brown sugar
  • ¾ cup smoky barbecue sauce
  • 2 Tbsp. honey
  • 1 Tbsp. Dijon mustard
  • 1 Tbsp. Worcestershire sauce
  • 1 Tbsp. apple cider vinegar
Method:
  1.   In a small bowl, combine the paprika, kosher salt, garlic powder, chipotle powder and 2 Tbsp. of the brown sugar.
  2. Rub the racks of ribs on both sides liberally with the spice rub, leave to marinate at room temperature for 45 minutes.
  3. While the ribs are marinating, prepare the sauce. In a medium bowl, whisk together the barbecue sauce, remaining brown sugar, honey, Dijon, Worcestershire and vinegar. Set aside.
  4. Pre-heat the oven to 275 degrees F.
  5. Brush, each side of the racks with some of the prepared sauce. Place each rack on a piece of aluminum foil and wrap tightly making sure no steam can escape. Place the racks onto a baking sheet, seam side up and place in the oven.
  6. Bake the ribs for 2 hours until cooked through and tender.
  7. Preheat your barbecue to medium-high heat.
  8. Remove the ribs from the foil and place onto the preheated grill. Baste with the remaining sauce and cook until caramelized, about 5 minutes a side.
  9. Slice and serve with the remaining sauce for dipping.
**if you don't have a barbecue the ribs can be finished in your oven under the broiler for 8 minutes




Friday, October 19, 2012

Eat to the Beat 2012

This past Tuesday was my fourth time participating in Eat to the Beat. You can read about my experience last year here.

This year I offered Wild Mushroom Soup Shooters topped with Chives and Truffle Oil. This year, for the first time, Eat to the Beat offered guests the chance to vote on their favourite dish of the evening and guess what? My dish won!!! I am always so honoured to participate in this event with such amazing and talented female chefs so wining is something I am very proud of.

Here is the winning recipe:

Wild Mushroom Soup
Serves 4-6
  • 1/4 cup olive oil
  • 1 stick (1/2 cup) butter
  • 2 shallots, minced
  • 5 cloves of garlic, minced
  • 3 sprigs of thyme, leaves picked of the stems
  • 1 pound cremini mushrooms
  • 1/2 pound shitake mushrooms
  • 1/2 pound oyster mushrooms
  • 1 small package (1 oz) dried porcini mushrooms, re-hydrated in 1 cup of boiling water, water reserved
  • 1 small package (1 oz) dried chanterelle mushrooms, re-hydrated in 1 cup of boiling water, water reserved
  • 1 1/2 cups white wine
  • 1 Litre vegetable stock
  • 2 cups heavy cream
  • kosher salt and fresh ground pepper to taste
  • truffle oil
  • chopped chives
  1. Heat a stock pot or large saucepan over medium heat, add the oil and butter. Once the butter has melted add in the shallots, garlic and thyme and cook, stirring occaisionally until softened and translucent, about 5 minutes. Add in the cremini, shitake and oyster mushrooms and saute until mushrooms are softened and starting to brown.
  2. Pour in the white wine, using a wooden spoon scrape off any brown bits that have collected on the bottom of the pan. Bring the wine to a boil and let reduce by half.
  3. Add in the porcini and chanterelle mushroom, along with the re-hydrating liquid as well as the vegetable stock. Bring to a boil, then lower the heat to low and allow to simmer for 20 minutes for the flavours to come together.
  4. Remove the soup from the heat, and using a hand blender puree until smooth.
  5. Place back on low heat and stir in the cream. Allow to come to a gentle simmer then remove from the heat and season with salt and pepper to taste.
  6. Place into serving bowls and top with a drizzle of truffle oil and a sprinkling of chives.
  7. ENJOY!


Thursday, October 11, 2012

Seared Scallops with Sweet Corn Risotto

Clearly you can tell by my lack of posting that it has been awhile since I have cooked. Well last night, I actually had the energy to prepare some dinner so I decided to go all out with something a little fancier than a regular weeknight meal.

Jordan and I love scallops but we usually have them with a light sauce as an appetizer. Since I wanted to prepare them as a main I needed an accompaniment that would round out the meal. Scallops and corn make a perfect couple so I decided to pair the simply seared scallops with a delicious sweet corn risotto. It was a perfect, indulgent weeknight meal and I am glad I mustered up the energy to prepare it.

Sweet Corn Risotto
Serves 4
  • 2 Tbsp. olive oil
  • 1 shallot, minced
  • 1 clove of garlic, minced
  • 1 cup arborio rice
  • 1 cup white wine
  • 4 cups chicken or vegetable stock, heated
  • 1 cup of corn, fresh or frozen, pureed until almost smooth
  • 1 cup of corn niblets, fresh or frozen
  • 2 Tbsp. butter
  • kosher salt and freshly ground pepper
  • handful of chopped chives
  1. Heat a large skillet over medium-high heat, once hot add the oil, shallot and garlic. Cook until softned and translucnet, about 3 minutes. Stir in the rice and stir to coat with the oil. Cook for one minute.
  2. Pour in the wine, and using a wooden spoon scrape off any brown bits from the bottom of the pan. Bring to a boil, and reduce by one half. Lower the heat to a simmer
  3. Pour one ladle of stock into the rice mixture, and continually stir, once the liquid is absorbed add another ladle of stock. Repeat this process until all the stock is used and the rice is cooked to al dente, adding in both the pureed and whole corn with the last stock addition.
  4. Stir in the butter and season with salt and pepper to taste. Stir in the chives and cover with aluminum foil to keep in the heat while you sear the scallops.
Simple Seared Scallops
This recipe can be used for any amount of scallops
  • fresh, sea scallops
  • paper towel
  • kosher salt and pepper
  • vegetable oil
  • butter
  • squeeze of lemon
  1. Place the sea scallops onto a peice of paper towl and blot out any excess moisture. Season with salt and pepper.
  2. Heat a large saute pan over high heat, once hot add enough vegetable oil to coat the bottom of the pan. Add the scallops, making sure not to over crowd the pan and sear until golden brown on each side, about 2-3 minutes per side.
  3. Once finished, add a small amount of butter and a squeeze of lemon juice to the pan and let melt and coat the scallops.
  4. Remove and serve. 

Tuesday, August 28, 2012

Heading South

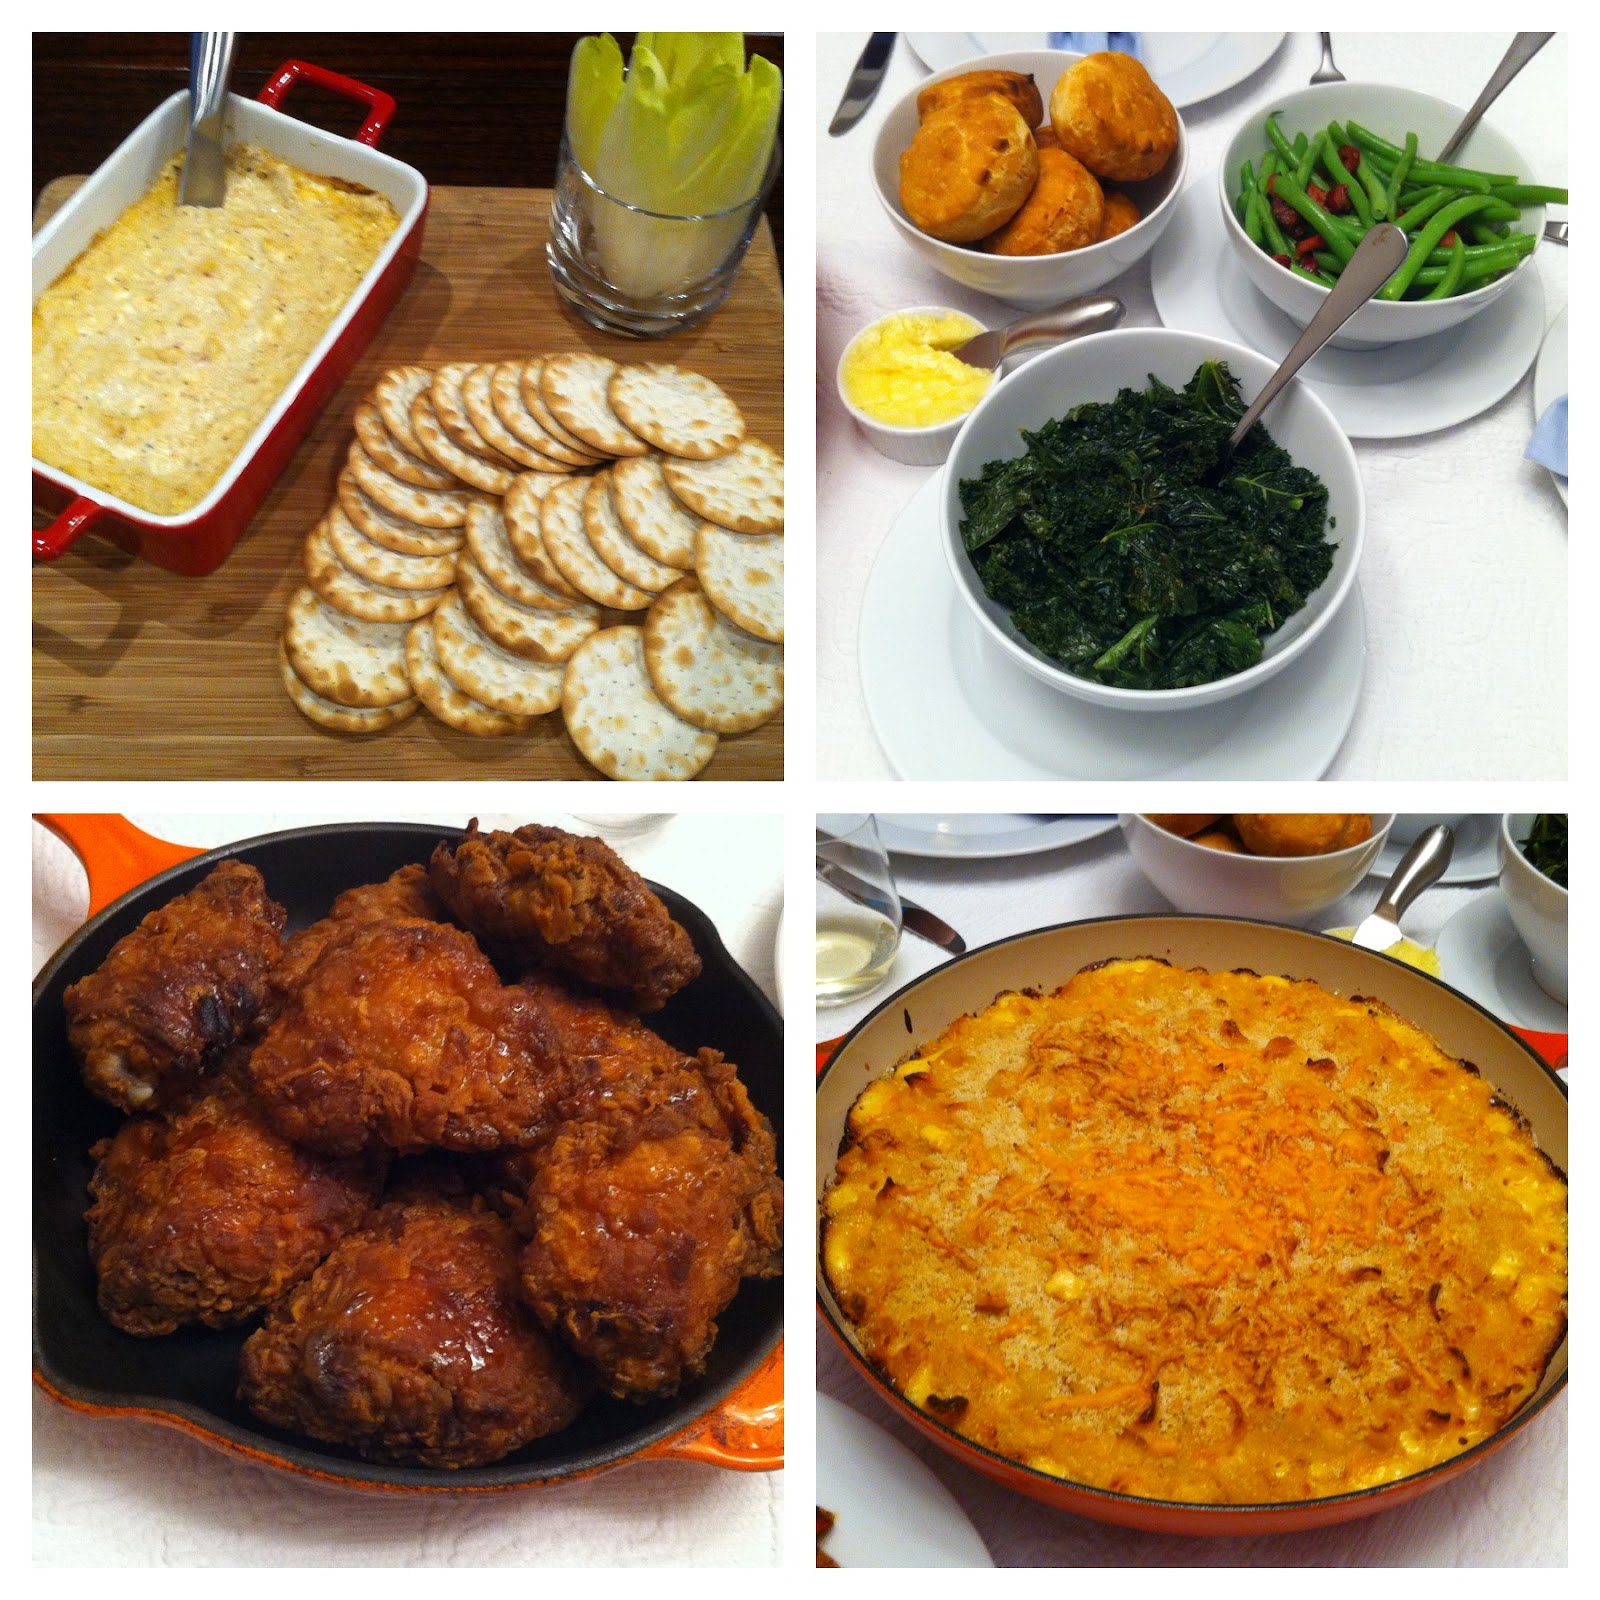
Years ago, my closest girlfriends and I started the tradition of hosting girls night dinner parties as often as we could. These dinners started off as a monthly event but as we get older and our lives started to change with houses, weddings, children, etc the dinners have become more and more sparse.  I think the last girls dinner I hosted my friend Ainsley was pregnant and her son is now 1! When I was able to gather my friends for one of the only quiet weekends of the summer I jumped at the opportunity to  host a dinner party. Inspired by a recent visit to Yardbird Southern Table in South Beach I developed a southern style menu and served everything family style for a casual feel.

On the Menu:
  • Blackberry-Ginger Lemonade
  • Creole Crab Dip with Crackers and Endive for Dipping
  • Southern Fried Chicken
  • Old Bay Blackened Shrimp
  • Mac and Cheese
  • Green Beans with Crispy Andouille Sausage
  • Sauteed Kale with Garlic
  • Biscuits with Honey Butter

The night was a success and hopefully we wont have to wait quite as long for another girls night dinner!

Here are a couple of the recipes from the evening as well as some pictures:

Creole Crab Dip
Serves 4-6
  • 1 can (120 g) lump crab meat, picked through for shells and cartilage
  • 1 small shallot, minced
  • 1/2 cup mayonaisse
  • 1/2 cup cream cheese, room temperature
  • 1 tsp. Old Bay seasoning
  • 1/2 tsp. Worcestershire sauce
  • squeeze of lemon juice
  • kosher salt and fresh ground pepper to taste
  1. Preheat the oven to 400 degrees F.
  2. In a mixing bowl combine the crab, shallot, mayo, cream cheese, Old Bay, Worcestershire and lemon juice. Season with salt and pepper to taste.
  3. Transfer the mixture to an oven proof dish and place in the oven.
  4. Bake until the top is golden and bubbly, about 15-20 minutes.
  5. Serve with your favourite crudite and crackers.
The Best Mac and Cheese
Serves 4 as a main
  • 1 lb. of elbow macaroni, or any other similar sized pasta (I used shells)
  • drizzle of olive oil
  • 4 Tbsp. butter
  • 1 shallot, minced
  • 1/4 cup. flour
  • 2 cups whole milk
  • 1 1/2 cups heavy cream
  • 1 cup velveeta cheese, cut into cubes
  • 3 cups grated sharp cheddar cheese
  • 1 tsp. paprika
  • 1 tsp. dry mustard 
  • dash of hot sauce
  • 1/2 cup Panko bread crumbs
  • salt and freshly ground pepper to taste
  1. Preheat the oven to 400 degrees F.
  2. In a large pot of boiling, salted water cook the pasta according to package directions. Drain, toss with the olive oil and set aside.
  3. In a medium saucepan, melt the butter over medium heat. Add the shallot and cook until softned, about 3 minutes. Stir in the flour and cook for 1 minute. Whisk in the milk and cream and continue to whisk until no clumps are present. Cook until the mixture begins to boil and is thickened then whisk in the cheeses.
  4. Once the cheese is melted, stir in the paprika, dry mustard and hot sauce then season with salt and pepper to taste.
  5. Pour the sauce over the pasta and stir to combine.
  6. Empty the pasta into a greased oven-proof casserole dish then sprinkle the top with the bread crumbs.
  7. Place in the oven and bake until bubbly and the crust is golden, about 20 minutes.


Monday, July 30, 2012

Tales from our Garden: Zucchini Fries with Herb Mayo

Year, after year zucchini seems to take over our garden. Before we even discover the zucchini growing it grows into ginormous sizes. 

I have began to run out of zucchini ideas so last week I decided to go with a classic.Whenever I think of zucchini I think of the breaded and crispy zucchini sticks that I used to order on my days off as staff at Camp Timberlane at the local Haliburton restaurant McKecks. This time, I went a little healthier than the deep fried ones from back in the day and decided to oven  bake them instead and instead of the creamy ranch dressing that used to come on the side I whipped up a herb mayo for dipping. These went great with a side salad and some barbequed sausages.

Zucchini Fries
Serves 4 as a side
  • 2 green zucchini, or 1 large one cut into strips
  • 3 eggs, beaten
  • 1 cup of flour
  • 2 cups of italian bread crumbs
  • 2 tsp. garlic powder
  • 1 tsp. paprika
  • salt and pepper to taste
  • olive oil for drizzling
  1. Preheat the oven to 425 degrees F.
  2. Place the egg, flour and bread crumbs into separate bowls. Season each with some salt and pepper. Mix the garlic powder and paprika with the bread crumbs.
  3. Dredge a strip of zucchini into the flour mixture, followed by the egg and then finally the breadcrumbs, place on a parchment lined baking sheet. Repeat with the remaining zucchini.
  4. Drizzle the zucchini with some olive oil and place in the oven to bake. 
  5. After 10 minutes, flip the zucchini over and place back in the oven for another 10-12 minutes or until the breading is golden and crispy and the zucchini is tender. 
  6. Serve with some herb may for dipping. 
  7. ENJOY!
Herb Mayo
Makes 1 cup
  • 1 cup of mayonnaise
  • 1 Tbsp. Italian parsley, chopped
  • 1 tsp. chives, chopped
  • zest and juice of one lemon
  • salt and pepper to taste
  1. In a small bowl, combine all the ingredients.
  2. Season with salt and pepper and serve. 

Monday, July 9, 2012

Tales from our Garden: Kale and Carrot Slaw


Wow! It has been quite awhile since I posted. The past couple months have been crazy including renovations on our house which has kept me out of the kitchen. Things are back to normal now so regular posts should resume.

We now have some catching up to do.

Over the May long weekend we planted our garden for this year, this year it includes:
- four types of tomatoes (beefsteak, cherry, heirloom and san marzano)
- kale
- carrots
- green onions
- peas
- corn
- zucchini
- cucumber
- herbs (basil, thyme, rosemary, sage, oregano)
- berries (strawberries, blueberries, raspberries and red currants)


The past few weeks have brought us many delicious raspberries which I have been enjoying by the bowl full daily,


This past weekend, I attended a pot luck picnic and decided to pick my first bunch of kale and a carrot from the garden to make up a delicious and easy kale slaw. This salad is perfect for a BBQ or potluck as the kale is hearty enough to remain crisp and not get soggy after a few hours.

This recipe is the first of many of this season's Tales from our Garden, so enjoy!

Kale and Carrot Slaw
Serves 6-8 as a side dish
  • 1/4 cup apple cider vinegar
  • 1 tsp. honey
  • 3/4 cup olive oil
  • 1 bunch of kale, shredded
  • 1 large carrot, grated
  • 1 cup roasted sunflower seeds
  • kosher or sea salt and freshly ground pepper to taste 
  1. In a small mixing bowl, whisk together the apple cider vinegar, honey and a pinch each of salt and pepper until combined. Slowly pour in the olive oil while whisking until the mixture is thick and emulsified. 
  2. Toss the dressing with the kale, carrots and sunflower seeds. Season with some more salt and pepper and allow to sit for a few minutes before serving. 

Friday, June 1, 2012

Grilled Flank Steak and Tomato-Bread Salad

Although the rain today is definitley regular spring weather, this past week in Toronto has felt more like summer. The other night I made this meal and it was perfect for a HOT spring/summer night

A perfect summer recipe is one that can be made quickly with as little time in the hot kitchen as possible. The marinade for the steak is super simple and I did it quickly before bed the night before so when I got home from work all I had to do was hand Jordan the steak to grill up on the BBQ and then whip up the salad.

I make this salad all the time but this time I decided to add some capers. I found these capers that were marinated in balsamic vinegar instead of regular white vinegar and I thought they would be a nice briny addition to the salad but you can use regular capers or leave them out all together if you wish. Also, I made my croutons from scratch but if you wanted to use store bought that would be great as well.

Marinated and Grilled Flank Steak
Serves 4 or 2 with leftovers for lunch
  • 3/4 cup olive oil
  • 1/4 cup red wine vinegar
  • 2 cloves of garlic, minced
  • 1 flank steak, about 1-2 lbs
  1.  In a large casserole dish whisk together the olive oil, vinegar and garlic.
  2. Place the flank steak in the marinade, spooning some of the marinade on the top of the steak. Cover with plastic wrap and place in the refrigerator.
  3. In the morning, flip the steak, recover with plastic wrap and place back in the fridge.
  4. Right before grilling, remove the steak from the fridge to take the chill off before grilling.
  5. Heat your BBQ to high and grill the steak until cooked to a medium-rare, about 4-6 minutes/side.
  6. Remove the steak from the grill, place on a cutting board and let rest for 10 minutes before thinly slicing. 
  7. Serve with the tomato-bread salad. 
 Tomato-Bread Salad
Serves 2-4
  • 1/4 cup extra virgin olive oil
  • 2 cloves of garlic, minced
  • 1 demi baguette (small baguette), cut into one inch cubes
  • 2 pints of cherry tomatoes, sliced in half
  • 1 Tbsp. of capers in balsamic vinegar, with the brine
  • a small handful of basil, torn into small pieces
  • a couple of handfuls of arugula
  • kosher salt and freshly ground pepper
  1. Heat the oven to 400 degrees F.
  2. Place the baguette cubes into a mixing bowl.
  3. In a small saucepan add the olive oil and garlic and place over medium high heat. Heat the oil until the garlic is just starting turn golden and fragrant then remove from the heat.
  4. Pour half of the garlic oil over the baguette cubes and toss to combine. Season with some salt and pepper then pour onto a baking sheet. Place in the oven and bake until golden and crispy, about 10 minutes.
  5. Remove the croutons from the oven and allow to cool, about 5 minutes.
  6. In a large mixing bowl combine the cherry tomatoes, capers, basil and bread cubes with the remaining garlic oil. Season with salt and pepper and toss to combine.
  7. Place the arugula on a platter and pour the tomato mixture on top.
  8. Serve with the sliced steak on the side and enjoy!

Wednesday, April 11, 2012

Passover Recipe: Passover Fried Chicken

It is now mid Passover week and I don't know about you but by now my mother's delicious brisket leftovers are not so delicious anymore. It is time for something different, so why not go southern?

I based this recipe off of Thomas Keller's famous Ad Hoc Buttermilk Fried Chicken recipe and although obviously not as good as the real thing this kosher for passover recipe is top notch.

Although you have to start the prep for this dish the night before, brining the chicken before hand ensures juicy and flavourful chicken and makes a huge difference. Enjoy this chicken fresh from frying, reheated in the oven or even cold.

Passover Fried Chicken
Serves 6 (2 pieces of chicken each)
  • 6 bone-in, skin-on chicken thighs
  • 6 chicken legs
  • 8 cups of water
  • 1/2 cup kosher salt
  • 1/4 cup honey
  • 6 bay leaves
  • 1 head of garlic, cut in half  horizontally
  •  1 Tbsp. black peppercorns
  • a few thyme sprigs
  • a handful of fresh parsley
  • juice and zest from 2 lemons
  • 6 eggs, whisked
  • 4 cups matzoh meal
  • 2 Tbsp. garlic powder
  • 1 Tbsp. paprika
  • a couple pinches of cayenne pepper
  • kosher salt and fresh ground pepper to taste
  • vegetable or canola oil for frying 
  • honey for drizzling
  1. In a large pot combine the water, salt, honey, bay leaves, garlic, peppercorns, thyme, parsley, and lemon zest and juice. Place on the stove over high heat and bring to a boil. Cook for one minute until all the salt is dissolved. Remove from the heat and let cool.
  2. Once the brine is cooled add the chicken pieces. Place in the fridge over night or up to 12 hours.
  3. When ready, remove the chicken from the brine and pat dry. Let come to room temperature.
  4. Place the eggs into a shallow dish. Combine the matzoh meal, garlic powder, paprika, cayenne and salt and pepper.
  5. Once the chicken is at room temperature you are ready to bread. Working with one piece at a time, place the chicken into the matzo meal mixture, followed by the egg mixture and then back into the matzoh meal. Place onto a baking sheet and repeat with the remaining chicken.
  6. Fill a large, saucepan with vegetable or canola oil and place over high heat. Once the oil is heated (if using a thermometer the oil should be about 325 degrees F), start frying the chicken a few pieces at a time until brown and crispy and cooked through. Remove onto a paper towel lined baking sheet and repeat with the remaining chicken.
  7. Just before serving drizzle the chicken with a little bit of honey.
  8. Enjoy!

    Monday, April 9, 2012

    Passover Recipe: Dark Chocolate and Fleur de Sel Matzoh Crunch

    It is that time of year again when Jews all around the world are celebrating Passover and thinking of creative ways to dress up the limited food that we can eat. One of the most popular Passover snacks is Matzoh Crunch; plain boring matzoh topped with delicious toffee and other delicious sweets. This year I decided to fancy up my matzoh crunch with some good quality  dark chocolate and fleur de sel. The results were SCRUMPTIOUS.

    Whether  you are celebrating passover or not whip up a batch today and you will not be disappointed.

    Dark Chocolate and Fleur de Sel Matzoh Crunch
    •  6 pieces of unsalted matzoh
    • 1 1/2 cups butter (or margarine)
    • 1 1/2 cups brown sugar
    • 100g bar of good quality dark chocolate
    • a few pinches of fleur de sel or other flaky salt
    1.  Preheat the oven to 325 degrees F.
    2. Lay the matzoh onto a parchment lined baking sheet (you may have to use more than one) and set aside. You can break some of the pieces of matzoh in half to fit more onto a tray
    3. In a small saucepan, over medium heat, melt the butter or margarine with the brown sugar until melted. Raise the heat to medium high and bring to a boil. Cook, stirring occasionally until starting to thicken, about 2-3 minutes.
    4. Pour the sugar mixture over the pieces of matzoh and spread using a spatula until all the pieces of matzoh are fully covered. Place in the oven and bake for 10-12 minutes, until golden.
    5. While the matzoh is baking, melt the chocolate over a double boiler or in the microwave in 30 second intervals, being very careful not to let it burn.
    6. Remove the matzoh from the oven and let cool for 2 minutes then lightly sprinkle with the fleur de sel. Allow to cool for another few minutes and then generously drizzle the chocolate over.
    7. Allow the chocolate to harden at room temperature for about 30 minutes and then break the matzoh into small pieces. 
    8. ENJOY!

      Tuesday, April 3, 2012

      Jamie Oliver's Meals in Minutes: Piri Piri Chicken, Dressed Potatoes, Arugula Salad

      Last night was the third installment of Jamie Oliver's Meals in Minutes cookbook test!

      On the menu:
      • Piri Piri Chicken
      • Dressed Potatoes
      • Arugula Salad
      This time, I followed the recipe exactly, no substitutions at all.

      Here are my thoughts:

      Ingredients: Just like the other recipes all the ingredients were easy to find and economical.

      Method: The method for this recipe was pretty easy to follow and was actually the simplest so far.

      Cook Time: Because I skipped the dessert portion of the recipe dinner was on the table in 30 minutes.

      The Food: This recipe was not one of our favourites. The potatoes were delicious but the chicken was lacking. We found the piri piri sauce to be quite strong from the vinegar and onions. I think if the sauce had some more time to cook, or was cooked prior to being added to the chicken we may have liked it a bit more. Either way it was still a satisfying meal that was easily prepared and I will definitley be making the potatoes again.

      Tuesday, March 20, 2012

      Panko Crusted Rainbow Trout with Caper-Dijon Aioli

      Jordan is not the biggest fish eater so whenever I have an evening to myself I take the opportunity to prepare some to enjoy on my own. Today I picked up a delicious looking filet of rainbow trout. The rest of the dish was easily made with ingredients I had on hand. It required minimal amounts of cooking which worked perfectly for a warm night like tonight. Just pair this fish with some steamed or grilled veggies or a side salad and you have a delicious, healthy and balanced meal.

      Panko Crusted Rainbow Trout
      Serves 1 (simply double, triple or quadruple the ingredients for more people)
      • 1 6 oz filet of rainbow trout
      • 1/4 cup panko breadcrumbs
      • 1 Tbsp. lemon zest
      • 1 Tbsp. finely chopped parsley
      • 1 tsp. butter, melted
      • salt and pepper to taste
      1.  Preheat the oven to 400 degrees F.
      2. Check the fish for any small bones and remove using fish tweezers or your fingers. Place onto a parchment lined baking sheet, skin side down.
      3. In a small bowl combine the breadcrumbs, zest, parsley and butter. Season with salt and pepper and stir until combined.
      4. Press the breadcrumb mixture onto the flesh of the fish. Bake in the oven until the fish is cooked through and the crust is brown and crisp, about 10-12 minutes.
      Caper-Dijon Aioli
      • 1/4 cup light mayonnaise
      • 1 tsp. capers, drained and chopped
      • 1 tsp chopped parsley
      • 1 tsp lemon zest
      • 1 tsp grainy dijon mustard
      • salt and pepper to taste
      1. Combine all the ingredients in a small bowl and stir to combine. 
      2. Serve with your favourite fish recipe.

      Thursday, March 1, 2012

      Roasted Herb and Balsamic Chicken with Caramalized Shallot Gravy and Shaved, Roasted Brussel Sprouts

      This meal is quick, delicious and perfect for weeknight cooking but is also fancy enough for weekend entertaining. I used chicken thighs but you can switch to white meat if you prefer, just adjust the cook time accordingly.

      Shaved, Roasted Brussel Sprouts
      Serves 4
      • 1 lb. brussel sprouts
      • olive oil
      • kosher salt and freshly ground pepper
      1.  Preheat oven to 400 degrees F.
      2. Using a knife or the slicer blade of a food processor thinly slice the brussel sprouts lengthwise into thin shavings.
      3. Place the brussel sprouts into a mixing bowl and toss with salt, pepper and a drizzle of olive oil.
      4. Place onto a baking sheet and roast, stirring occasionally until golden, about 20-25 minutes. Once in the oven, start preparing the chicken.

      Roasted Herb and Balsamic Chicken
      Serves 2-4
      • 4 bone-in, skin-on chicken thighs
      • 3 sprigs thyme, roughly chopped
      • 1 small spring rosemary, roughly chopped
      • 1 clove of garlic, chopped
      • 2 tsp. dijon mustard
      • 2 tsp. honey
      • 1/4 cup olive oil
      • 2 Tbsp. balsamic vinegar
      • kosher salt and freshly ground pepper
      1. Preheat the oven to 400 degrees F and heat a large saute pan over high heat.
      2. Season the chicken breasts with some salt and pepper then place into the heated saute pan, skin side down. There is no need to add any extra oil, the fat from the chicken will  be enough. Let cook until brown and crispy.
      3. While the chicken is browning, whisk together the remaining ingredients in a small bowl. Once the chicken is brown and crispy, flip over, allow to cook for a minute longer then remove from the heat. Pour the balsamic mixture over the chicken then place in the oven.
      4. Roast until chicken is cooked through, about 20 minutes. A meat thermometer should read 165 degrees F. While the chicken is roasting prepare the gravy.
      Caramelized Shallot Gravy
      • 1 Tbsp. olive oil
      • 2 large shallots, thinly sliced
      • 1 clove of garlic, minced
      • 1 sprig of thyme, roughly chopped
      • 1/4 cup balsamic vinegar
      • 1 Tbsp. flour
      • 2 cups chicken broth
      • 1/4 cup heavy cream
      • kosher salt and freshly ground pepper
      1. Heat a large saute pan over medium-high heat. Add 1 tsp of the oil, the shallots, garlic and thyme. Cook the shallots, stirring occasionally until almost burnt, about 5 minutes then stir in 1/4 cup of stock and the balsamic vinegar. Reduce the liquid, stirring occasionally until the shallots are caramelized, they should have a syrupy consistency.
      2. Stir in the remaining oil and the flour to form a roux. Cook out for 1 minute then slowly stir in the stock. Bring the mixture to a boil, lower the heat and allow to simmer for 1 minute then stir in the heavy cream. 
      3. Season with salt and pepper and serve.

        Wednesday, February 29, 2012

        Jamie Oliver's Meals in Minutes: Pregnant Jooles's Pasta, Crunchy Red Endive and Watercress Salad

        Last night was the second of my Jamie Oliver's Meals in Minutes cookbook test.

        On the menu:
        • Pregnant Jools's Pasta (essentially pasta with meat sauce)
        • Crunchy Red Endive and Watercress Salad (I used baby arugula which the book gave as an option)
        I pretty much followed the recipe exactly except for a few simple swap outs. I changed the type of pasta from penne to farfalle (bowties) and instead of using sausages in the sauce I used ground veal. The recipe in the book included a dessert (little frangipan tarts) but since we try to eat somewhat healthy during the week I decided to skip it. The tarts looked and sounded delicious so I will probably test the recipe out on the weekend and bring them to a friend's house.

        Here are my thoughts:

        Ingredients: Just like last time all the ingredients were easy to find in my local supermarket. Besides being incredibly easy to find the ingredients were also very reasonable. My whole bill for this meal cost just over $20.

        Method: This time around, the method was a little tougher than last time. This was partly my fault since I skipped the dessert. Because of this, I had to skip the steps based around the tarts and often found myself losing my spot on the page. Other than that, this recipe was easy to follow. My only other complaint was that the recipe called for the meat to be cooked on a high heat, I found for the time given to cook the meat I had to turn the temperature down a bit about halfway through the cooking time as my sauce was starting to burn but like any recipe you have to pay attention and adjust accordingly.

        Cook Time: This meal was even quicker than the last one. I had dinner on the table in just under 30 minutes! In fact, when I called Jordan to the table his response was "What??? Already???"! Granted, I skipped the whole dessert section of the recipe but if you included it it would probably only add about 10-15 minutes to the cook time.

        The Food: Once again, DELICIOUS! The meat sauce tasted like it had  been cooked all day and was the perfect comfort food for a cold winter's night. The salad was fresh and crunchy and was the perfect accompaniment for the pasta. Another satisfying meal from Mr. Jamie Oliver!

        Tonight I am cooking my own recipe so make sure to check back tomorrow for a post on:
        • Roasted Herb Chicken
        • Caramelized Shallot Gravy and
        • Shaved, Roasted Brussel Sprouts

        Thursday, February 23, 2012

        Jamie Oliver's Meals in Minutes: Green Curry, Crispy Chicken, Kimchee Slaw and Rice Noodles

        As discussed in my post the other day, for the next few weeks I am going to be putting Jamie Oliver's Meals in Minutes cookbook to the test.

        The book is divided up into different complete meals (3-5 dishes each) so last night I decided to cook:
        • Green Curry
        • Crispy Chicken
        • Kimchee Slaw
        • Rice Noodles
        You can find the recipe on Jamie's website here.

        Here is what I thought of the recipe:

        Ingredients: All the ingredients were easy to find in my local supermarket. There was nothing strange or unusual, in fact I had most of the ingredients in my fridge and pantry.

        Method: The recipe is written as one long process instead of individual recipes for each dish. This is a super handy feature as it allows you to do many things at once and ensures that all the dishes will be ready at the same time. My only complaint was that because the recipe was written this way, I didn't have much time to clean as I went (one of the number one rules taught in culinary school) so I (and by "I" I really mean Jordan) was left with a sink full of pots, pans, utensils and appliances.

        Cook Time: This book definitley delivered on it's title. I got home from work at around 6:30 and Jordan and I were sitting and eating ALL the dishes at just past 7pm. Granted, I have a lot of experience in the kitchen, but  the everyday home chef can definitley complete this recipe in 30-45 minutes.

        The Food: First of all, the chicken was AMAZING! It was perfectly crispy on the outside but still juicy on the inside. The honey and green curry paste added a delicious sweet, slightly spicy and sticky glaze that had Jordan and I licking our fingers and plates. The green beans and slaw were delicious as well. We probably could have done without the rice noodles as the three other dishes were enough to fill us, but they came in handy to soak up leftover green curry sauce from the beans.

        Overall, I was very satisfied with my first meal from this book and am looking forward to the next. Thanks Jamie!

        Saturday, February 11, 2012

        Bobby Flay Inspired Dinner

        When I was in Las Vegas in September I ate at a variety of delicious restaurants including Bobby Flay's Mesa Grill. I was so impressed with my meal at Mesa that I ordered the restaurant's cookbook as soon as I got home. Since then I have made a few things out of the book and was very impressed with all of them. Last weekend Jordan and I had my friend Mandy and her fiance Jason over for dinner. They are both HUGE fans of southwestern cuisine so I thought it was the perfect opportunity to prepare a meal from this book. I combined my own recipes with Bobby's (I like to pretend we are on a first name basis) to make the following menu:
        • Ginger and Pineapple Mojitos
        • Fresh Guacamole and Salsa served with Fresh Tostones
        • Warm Cornbread with Honey Butter
        • Shrimp and Corn Tamales with Roasted Garlic Sauce
        • Chipotle-Honey Glazed Steak with Roasted Pepper Relish
        • Roasted Garlic Mashed Potatoes
        • Ancho Chili Roasted Brussel Sprouts
        • Warm Chocolate Cakes with Dulce de Leche
        The tostones, tamales, steak and chocolate cake recipes were all from the cookbook which can be bought on Amazon.ca . You can also find a lot of the recipes published online on various food websites.

        Here are the recipes for the dishes I made:

        Ginger and Pineapple Mojito
        Makes 4 Glasses
        • 1/2 cup water
        • 1/2 cup sugar
        • 3-4 slices of fresh ginger
        • 4 shots (about 1.25 oz or 2.5 Tbsp each) dark rum 
        • a bunch of mint
        • 4 Tbsp. freshly squeezed lime juice
        • 1 cup finely diced pineapple
        • ice
        • 2 cups club soda
        1. In a small saucepan combine the water, sugar and ginger. Heat over medium-high heat until sugar is dissolved and the liquid is just simmer. Turn off the heat and allow the ginger to steep while the mixture cools. (this step can be prepared ahead of time)
        2. Set up 4 tall glasses. In the bottom each combine, 1.5 Tbsp of the ginger syrup, 1 shot of rum, a few sprigs of mint, 1 Tbsp. of lime juice and a 1/4 cup of the pineapple. Using a pestle or a spoon, muddle the ingredients together.
        3. Top each glass with some ice and 1/2 cup of club soda
        Fresh Guacamole
        Serves 4 as an appetizer
        • 2 ripe avocados, peeled, seeded and quartered
        • 1 plum tomato, diced
        • 1 Tbsp. red onion, diced
        • 1/2 jalapeno, ribs and seeds removed, diced (optional)
        • 1-2 Tbsp. chopped cilantro (optional)
        • juice of 1 lime
        • course sea or kosher salt
        1. Combine all the ingredients into a mortar or into a large mixing bowl. Using the pestle or a fork mash all the ingredients until the desired consistency is achieved.
        2. Season with salt and garnish with some more cilantro and diced tomatoes. 
        Fresh Tomato Salsa
        Serves 4 as an appetizer
        •  6 plum tomatoes, chopped
        • 1/4 cup red onion, diced
        • 1 clove of garlic, minced
        • 1/2 jalapeno, ribs and seeds removed, dice (optional)
        • 1-2 Tbsp. chopped cilantro (optional)
        • juice of 1 lime
        • sea or kosher salt
        1. Combine all the ingredients in a mixing bowl. Season with salt.
        2. Let rest for at least minutes before serving.
        Roasted Garlic Mashed Potatoes
        Serves 4
        •  2 lbs. Yukon Gold potatoes, peeled and cubed
        • 1 head of garlic, roasted and pureed 
        • 3 Tbsp. butter
        • 1/2 cup heavy cream
        • 1/4 cup chopped chives (optional)
        • salt and pepper
        1. Place the cubed potatoes into a large pot and cover with cold water. Season with salt. Place over high heat and bring to a boil. Once boiled, lower the heat and cover. Let simmer until potatoes are tender, about 20 minutes.
        2. Drain the potatoes and place back in the pot. Add the butter, cream and mashed garlic. Using a garlic masher, mash the potatoes until smooth the fold in the chives. Season with salt and pepper to taste
        Ancho Chili Roasted Brussel Sprouts
        Serves 4
        • 1 lb. brussel sprouts, tough leaves removed and cut in half lengthwise
        • 1 1/2 Tbsp. olive oil
        • 1 tsp. ancho chili powder
        • 1 tsp. paprika
        • kosher salt
        1. Preheat the oven to 425 degrees F.
        2. In a large mixing bowl toss the brussel sprouts with the oil, chile powder, paprika and a couple of pinches of salt. Spread out onto an aluminum lined baking sheet.
        3. Bake in the oven in tender and brown, about 20-25 minutes, tossing occasionally.  


            Wednesday, December 21, 2011

            Dinner for One: Lobster Salad Sandwich

            I was on my own for dinner last night so while I was searching the grocery store for items for a quick supper I came across a cooked lobster on special for $10. I didn't have to search any further. Using items I already had at home I whipped up this simple yet delicious open-faced lobster sandwich.

            Lobster Sandwich for One
            • 1 small cooked lobster, meat removed (or about 1 cup of lobster meat), chopped into small pieces
            • 1 Tbsp. Hellman's Half the Fat mayonnaise
            • squeeze of lemon juice
            • dash of Frank's hot sauce
            • sprinkling of chopped chives
            • 2 slices sourdough bread
            • 1/2 avocado, mashed
            • 1 tomato, sliced
            • salt and pepper to taste
            1. In a small mixing bowl combine the lobster meat with the mayonnaise, lemon juice, hot sauce and chives. Season with salt and pepper and set aside.
            2. Toast the bread and lay on a plate. Spread the avocado on each slice of bread and top with a few tomato slices, season with salt and pepper.
            3. Top the bread with the lobster salad and enjoy!!!

              Monday, December 19, 2011

              Panko Crusted Rack of Lamb with Rosemary and Orange

              A few months ago I made a delicious rack of lamb from Thomas Keller's Ad Hoc at Home cookbook. It was one of the best lamb dishes I have ever had with the most perfect crust. Tonight, I prepared lamb using the same coating process as the recipe in the book but changed up the flavourings. I served the lamb with a simple arugula salad with avocado and oranges to compliment the orange zest in the lamb.

              Panko Crusted Rack of Lamb with Rosemary and Orange
              Serves 4
              •  3 Tbsp. unsalted butter, softened
              • 2 Tbsp. Dijon mustard
              • 1 Tbsp. honey
              • 2 cloves of garlic, minced
              • 1 Tbsp. orange zest
              • 1 tsp. chopped fresh rosemary
              • 1 rack of lamb, frenched (make sure the rack has at least 8 bones)
              • vegetable oil for searing
              • 3/4 cup panko bread crumbs
              • kosher salt and freshly ground pepper to taste
              1. Preheat the oven to 425 degrees F.
              2. In a small mixing bowl, combine the butter with 1 Tbsp. of the Dijon, the honey, garlic, orange zest and rosemary. Stir until well combined. Season with salt and pepper and set aside.
              3. Season the rack of lamb with salt and pepper on both sides. Heat a large Saute pan over high heat. Once hot, coat the bottom of the pan with vegetable oil and sear the rack, fat side down first, until brown and crisp, about 2 minutes per side. Remove the rack from the pan, and place, fat side up, on a roasting rack in a roasting pan, or on top of a cooling rack placed on top of a sheet pan. Let cool.
              4. While the lamb is cooling, gently fold the panko bread crumbs into the butter mixture until just combined. Once the lamb is cool enough to handle, brush the remaining Dijon on the fat side of the rack, then press the butter mixture onto the rack until nicely coated.
              5. Place the lamb in the oven and roast until a meat thermometer reads 150 degrees F for medium-rare. About 20-25 minutes. Remove the lamb from the oven and let rest for 10 minutes before slicing in between the bones. 
              *if the crust falls off when slicing (it sometimes happens) simply sprinkle the crumbs ontop of the lamb when serving. It will still be delicious!!!!


              Thursday, December 8, 2011

              Chipotle and Honey Glazed Steak with Warm Corn Salad

              This Tex-Mex style dish is spicy but sweet and hearty but light. It is the perfect combination of flavours, is super quick and perfect for a weeknight. The flavours and spice will warm up any cold winter evening but you can also serve the dish at room temperature for lunch or for a light summer meal. I used ribeye cap for the steak because that is what I had on hand but this recipe will work with pretty much any cut of beef you have on hand. flank or flat iron steak will work great as well. Both recipes are adapted from The Mesa Grill Cookbook by Bobby Flay.

              Chipotle and Honey Glazed Steak
              Serves 4
              • 1.5 lb. ribeye cap, flank or flat iron steak
              • 1/2 cup honey
              • 1 Tbsp. chipotle puree (if you can't find chipotle puree, make your own by pureeing a can of chipotle in adobo in a food processor, the puree will keep in an air tight container in the refrigerator for up to a month)
              • 1 Tbsp. Dijon mustard
              • 1 Tbsp. vegetable oil
              • 1 clove of garlic, minced
              • kosher salt and freshly ground pepper to taste
              • vegetable oil for searing
              1.  Preheat the oven to 425 degrees F.
              2. Remove the steak from the fridge and allow to come to room temperature before searing.
              3. Meanwhile, prepare the glaze by combining the honey, chipotle, Dijon, vegetable oil and garlic in a small bowl until combined. Season with salt and pepper to taste.
              4. Liberally season the steak with salt and pepper.
              5. Heat a large skillet over high heat. Once hot, add enough vegetable oil to coat the bottom of the pan. Sear the steak until brown, about 2 minutes per side. Brush the top of the steak with some of the glaze and place in the oven. 
              6. Cook until steak is cooked through (about 10-20 minutes depending on the cut of steak), basting with some more glaze halfway through cooking. 
              7. Remove the steak from oven, brush with some more of the glaze and let rest for 10 minutes. Thinly slice the steak and serve atop of the corn salad.
              Warm Corn Salad
              Serves 4
              • 1 tsp. vegetable oil 
              • 1 tsp. butter
              • 1/2 red onion, chopped
              • 2 cloves of garlic, minced
              •  2 tsp. ancho chili powder (can be found at most grocery stores)
              • 1 red or poblano pepper, halved and seeds removed
              • 4 ears of corn, kernels remove
              • 1 lime, juiced and zested
              • chopped cilantro (optional)
              1. Preheat your ovens broiler. Place the pepper halves, skin side up on a baking sheet and place in the oven. Roast until the skin is black and charred then place in a bowl and cover with saran. Let sit for 10-15 minutes. Once cool enough to handle, remove saran wrap and peel away the black skin from the pepper. Chop and set aside.
              2. Heat a small saute pan over medium heat. Add the oil, onion and garlic and saute until softened.
              3. Stir in the chili powder and cook until fragrant, about 30 seconds then add the corn, stir to coat. Continue to saute until the corn cooked through. Stir in the roasted pepper, lime juice and lime zest.
              4. Transfer to a platter and top with cilantro if you wish then serve with the sliced steak.


                Wednesday, November 30, 2011

                Skillet Spanish Chicken

                I am always sourcing the internet, magazines, cook books, etc for recipe inspiration. A while back I bookmarked the recipe here with plans to make it eventually. Well last night was the night. I am never one to follow a recipe exactly so I changed it up a bit. It turned out delicious and was super easy for a weeknight meal. The best part? I only used one pan! I served it up with some Spanish rice and it was a perfect hearty meal for a cold and rainy night like yesterday.

                Spanish Skillet Chicken
                Serves 2-4
                •  4 skin on, bone in chicken thighs
                • 2 Tbsp. olive oil
                • 1 tsp. chopped fresh thyme
                • 1/4 tsp. sweet paprika
                • 1/4 tsp. smoked paprika
                • pinch of cayenne pepper
                • 1/4 cup Sherry
                • 1 small can cherry tomatoes, excess liquid drained (you can also use 1 pint of fresh cherry tomatoes, but I like the saucy consistency the canned ones add to the dish)
                • 1 roasted sweet bell pepper, sliced (I roasted mine myself but to save time you can use jarred)
                • 1 roasted piquillo pepper, sliced (same as above)
                • 1/2 large sweet onion, sliced
                • 1/4 lb. cured chorizo sausage, sliced
                • 5 cloves of garlic,  roughly chopped
                • small handful parsley, chopped
                • kosher salt to taste
                1. Preheat the oven to 450 degrees F.
                2. In a mixing bowl combine the chicken with the 1 Tbsp. of the olive oil, thyme, both paprika, cayenne pepper and a pinch of salt. Toss until the chicken is coated.
                3. Heat a medium sized skillet over high heat. Once hot add the remaining olive oil. Sear each piece of chicken until the skin is crispy, about two minutes per side. Remove the chicken to a plate, keeping the skillet on the heat.
                4. Lower the heat to low and pour in the sherry, using a wooden spoon scrape up any brown bits from the bottom of the pan and then let the sherry reduce by half. Once reduced take the pan of the heat.
                5. Add the tomatoes, peppers, onion, chorizo, garlic and a sprinkling of salt to the pan lightly stir to combine and then place the chicken pieces on top. Place the skillet into the oven and roast until chicken is cooked through, about 30 minutes.
                6. Carefully remove from the oven, sprinkle with the parsley and serve with Spanish rice. 

                  Wednesday, October 19, 2011

                  Eat to the Beat 2011

                  Last night I participated in Eat to the Beat a wonderful annual fundraising gala that gathers female chefs from around the city to support Willow Breast Cancer Support Canada. Check out some more info here.

                  This was my third year participating in this event. Each participating chef prepares a bite size hors d'oeuvre for guests to enjoy. Last year I served BLT Bites; toasted brioche rounds with sundried tomato spread, arugula, roasted garlic aioli and crisp applewood smoked bacon.

                  photo of my last year's offering courtesy of Eat to the Beat's twitter page
                  This year, inspired by the season I prepared a Butternut Squash and Apple Soup with a Hint of Maple Syrup.

                  Because I prepared this soup for 1000 people I don't have the exact recipe but here is a scaled down version that is pretty much the same. I topped the soup off with some sour cream seasoned with sage and chives and some candied pumpkin seeds.

                  Butternut Squash and Apple Soup with Maple Syrup
                  Serves 4-6
                  • 2 Tbsp. olive oil
                  • 1 small spanish onion, chopped
                  • 1 rib of celery, chopped
                  • 2 cloves of garlic, chopped 
                  • 1 tsp. fresh chopped ginger 
                  • 1/2 Tbsp. chopped fresh sage
                  • 1 lb. butternute squash, peeled and cut into cubes
                  • 1 granny smith apple. peeled, cored and cubed
                  • 4 cups (1 L) chicken or vegetable stock
                  • 1-2 Tbsp. maple syrup
                  • salt and pepper to taste
                  1. Heat a small stock pot over medium-high heat. Add the olive oil, then the onions. Saute the onions until softened and starting to turn golden then add the celery, garlic, ginger and sage. Continue to cook until softened. Add in the squash and apples and continue to cook for a minute longer.
                  2. Pour in the stock. it should be enough to cover the vegetables. Bring to a boil then cover and lower the heat. Let simmer until vegetables are soft and tender, about 30-40 minutes.
                  3. Using a hand blender, puree the soup until smooth. Stir in maple syrup, salt and pepper to taste.


                    Related Posts Plugin for WordPress, Blogger...