Recent Posts

Saturday, November 28, 2009

Macaroon Challenge

A few months ago, my parents went on vacation to Paris. Knowing me well, all the gifts they brought back for me were ones I could eat. One of my favorites was the beautifully decorated box from Laduree filled with eight, delicate, delicious, Parisian macaroons (or macarons, if I were French); smooth, flavourful filling sandwiched between two delicate, melt in your mouth almond meringue cookies. I had tried French style macaroons before, but none had tasted like these.

www.laduree.fr

 Doing some research on the internet I combined a few recipes, to try to duplicate these cookies, so here lies THE MACAROON CHALLENGE!!!! I decided to start small and just try the most basic flavour, a vanilla cookie with vanilla buttercream filling. I decided to throw in some food colouring, just to make them look a little bit more interesting.

Here is the recipe I used:

Macaroons
  • 1 3/4 Cup icing sugar
  • 1 1/2 Cups almond flour or finely ground blanched and peeled almonds
  • 3 large egg whites
  • pinch of salt
  • 1/4 Cup granulated sugar 
  • 1/4 tsp. vanilla extract
  • food colouring (optional)
Buttercream Filling
  • 1/2 stick (1/4 cup) butter, at room temperature
  • 1 Cups icing sugar, sifted
  • 1/2 tsp. vanilla extract 
  • 1 Tbsp. Heavy Cream
  • food colouring (optional)
 
1. Preheat the oven to 300 degrees F.
2. Line a large baking sheet with parchment paper, using a permanent marker trace circles onto the paper, using something the size you want your macaroons to be, then flip the paper making sure you can still see the circles.
3. Sift icing sugar and almond flour into a small mixing bowl, and whisk to combine.
4. In a large mixing bowl beat egg whites with an electric mixer on medium speed until foamy, add the salt and continue to mix while gradually adding the granulated sugar. Continue to beat until the egg whites form medium peaks.
5. Using a rubber spatula, gently fold the almond mixture, vanilla extract and food colouring (if using) into the egg whites until just combined. Tap the bottom of the bowl on the counter to get rid of any air bubbles.
6. Transfer the mixture into a large piping bag, with a medium sized plain tip. Pipe the mixture into the traced circles on the baking sheet.
7. Place in the oven and bake until the macaroons become slightly firm on the top and can be lifted off the parchment paper, about 20 to 25 minutes. The bottoms of the macaroons should be completely dry.
8. While the macaroons are baking, prepare the buttercream.
9. In a medium mixing bowl, beat the butter with an electric mixer on medium speed until fluffy, add the vanilla then gradually mix in the icing sugar until combined, occasionally scraping the sides of the bowl with a rubber spatula. Add the cream then increase speed to high and continue to beat until icing is fluffy, about 3 minutes. Tint with food colouring if using.
10. remove the macaroons from the oven and let cool on the baking sheet for about five minutes, before lifting the entire parchment onto a wire rack to cool completely.
11. Once completely cool, spread about 1 tsp. of the buttercream mixture onto the flat side of one macaroon, and then sandwich with another macaroon.
12. Macaroons can be stored for about 3 days in an airtight container in the refrigerator.

Here is how my macaroons turned out:


Generally, the cookies turned out pretty close to the ones I had from Laduree. Obviously, nothing is as good as the orginal, but these are lot easier then flying to Paris. I just have to practice my piping to get them into perfect circles. I'm looking forward to trying out some different flavours. Stay tuned.....


Thursday, November 26, 2009

Favorite Products: Brie Baker

One of my go-to party foods is baked brie. It is one of the easiest things to make, guarantees a ton of compliments, and is devoured within minutes every time I make it. The only problem was finding the perfect vessel to both bake it and serve it in, until I found my Petite Maison Brie Baker by Wildly Delicious, available at Bowring or Wildly Delcious. The earthenware container comes in both white and red, and comes with a useful and stylish bamboo spreader.


photo courtesy of www.wildlydelicious.com


Simply place a wheel of brie into the baker, top with any of your favorite toppings and bake in a hot oven until the centre is warm and gooey. Serve with crackers and crusty french bread, and get ready to enter cheese heaven.

Some of my favourite ways to top baked brie are:
  • as is, there is nothing wrong with plain, ooey, gooey, delicious brie
  • apricot preserves and slivered almonds
  • caramalized onions, sliced figs and honey
  • chopped tomatoes, garlic and basil or for an easy route, store bought bruschetta mix
  • for the holiday season, cranberry preserves and walnuts
  • sauteed wild mushrooms with garlic
  • roasted red pepper or sun dried tomato tapenade

Wednesday, November 25, 2009

"What's For Dinner?" Wednesday: Mexican Rice Bowl

Rice bowls are becoming a very popular menu item at restaurants. I love the comforting feeling you get from eating your whole meal, in one steamy, hot bowl. My version of a Mexican Rice bowl, is a healthy and hearty weeknight meal, and the leftovers are great wrapped in a tortilla for lunch the next day. The fact that it is cooked in one pot also helps make it a speedy clean up.

Mexican Rice Bowl
Serves 4
  • 1 medium onion, chopped
  • 2 cloves of garlic, minced
  • 1 chorizo sausage, sliced into 1/4 inch rounds
  • 1 boneless, skinless chicken breast, cut into 1/2 inch slices
  • 1 cup long grain, white rice
  • 1/2 Tbsp. chili powder or Tex Mex seasoning
  • 1 can (341ml.) corn niblets
  • 1 can (540 ml.) black, pinto or kidney beans, drained and rinsed
  • 1 can (127ml.) green chilies, drained (found in the Mexican food aisle)
  • 1 can (796 ml.) chopped tomatoes with liquid
  • 1 1/2 cups chicken broth
  • grated cheese, sour cream and sliced green onions for garnish (optional)
1. Heat a large saute pan over medium high heat, add the oil and cook the onions and garlic until softened, add in the chorizo and chicken and cook until the chicken no longer looks pink. Stir in the rice and chili powder and cook for 1 minute.
2. Add in the rest of the ingredients, and stir to combine. Bring up to boil, then lower heat to medium-low, cover and let simmer, stirring occasionally, until the liquid is evaporated and the rice is cooked, about 15 minutes.
3. Place into individual bowls, top with some grated cheese, sour cream and green onions.

Olé!

    Tuesday, November 24, 2009

    Quick Tip

    Have you ever read a recipe that called for a certain measurement but you only had a measuring cup that measured in cups? If so, check out this awesome measuring equivalent chart. This is just one of the many templates available on Martha Stewart's website. Thanks Martha!

    Thursday, November 19, 2009

    Favorite Products: Truffle Oil

    No, I'm not talking about oil made from chocolate. I am talking about oil infused with actual truffles, the fungi. If you know what I am talking about you are probably thinking, "truffle oil? Isn't that insanely expensive?". Which brings me to why Truffle Oil is one of my favorite products. Although real, fresh truffles can cost you as much as thousands of dollars a pound, truffle oil is a great way to enjoy the deep, earthy, rich flavour of truffles without filing for bankruptcy. There are many versions of truffle oil available, and some even available at your local Loblaw's. They can vary in price depending on whether they contain real truffles or not. The majority of truffle oils here in Canada are essentially just olive oil  that are infused with truffle essence, while others actually contain real truffles (obviously more expensive). Although not as good as the real thing, these truffle oils do a great job of making me feel like I am enjoying a 5 star meal right in my own home. A small bottle will cost you about 15 to 20 dollars, but since you only need a drop to impart that delicious truffle flavour, the bottle will last quite awhile.


    Some of my favorite uses of truffle oil are:
    • mixed with some mayonnaise to dip french fries in, or to enhance a sandwich
    • drizzled over soup
    • drizzled over some mixed greens
    • to finish off a pasta dish (especially homemade white cheddar mac and cheese)
    • mixed in with my scrambled eggs or omelets
    • drizzled over steak
    If you love the taste and aroma of truffles when you eat out in a restaurant, I highly recommend purchasing some truffle oil to keep on hand, for those necessary at home indulgences.

    Wednesday, November 18, 2009

    "What's For Dinner?" Wednesday: Flank Steak with Balsamic Onions

    Flank steak is a great way to enjoy a steak dinner during the week, it is very reasonably priced and is a relatively lean cut of beef. Although, flank steak has a bit of a bad reputation, as it can sometimes turn out tough, if done well it is a delicious alternative to an expensive and very high calorie restaurant style steak dinner. This recipe goes great served with some steamed asparagus and some potato crisps (like the one's used in my Potato Crisps with Dill Cream and Smoked Salmon recipe).

    Flank Steak with Balsamic Onions
    Serves 4
    • 1 Tbsp. vegetable oil
    • 1 Tbsp. Worcestershire sauce
    • 2 tsp. steak spice 
    • 1/2 cup plus 1 Tbsp. balsamic vinegar  
    • 1/2 cup ketchup
    • 1.5 lbs of flank steak
    •  1 Tbsp. olive oil
    • 1 sweet onion, sliced
    1. In a small mixing bowl combine the vegetable oil, Worcestershire sauce, steak spice, 1 Tbsp. of balsamic vinegar and ketchup.
    2. Place the steak in a casserole dish and prick the top many times with a fork before pouring over the ketchup mixture, let marinate for at least an hour for as long as overnight.
    3. Preheat the broiler on your oven.
    4.Remove the steak from the marinade and  place on an aluminum lined baking sheet, place on the top rack of the oven, about 6 inches away from the broiler, for 20 minutes for a medium cooked steak.
    4. Meanwhile, heat a large saute pan over medium high heat, add the olive oil and onions and saute until softened, turn the heat to low and let cook until onions start to become golden and caramelized. Pour in the remaining balsamic vinegar and continue to cook, until the vinegar has reduced and turned to a syrupy consistency. Season with salt and pepper and set aside.
    5. Remove the steak from the oven and place on a cutting board, cover with aluminum foil and let rest for 10 minutes.
    6. Slice the steak into thin slices, making sure to cut across the grain of the meat. Place on a serving platter and top with balsamic onions.

    Enjoy!!!!

    Monday, November 16, 2009

    Sunday Brunch

    Brunch is one of my favorite meals to entertain with, so this weekend I invited all of my bridesmaids for my upcoming wedding over so everyone could get to know each other. Besides the obligatory bagels and cream cheese I decided to add in some brunch style hors d'oeuvres.

    On the menu:
    •  two types of mini egg white frittatas (caramelized onion with aged cheddar and spinach, cherry tomato and goat cheese)
    • mini Belgian waffles with maple pears and whipped cream
    • yogurt, honey and berry parfaits
    • brie and fig tarts
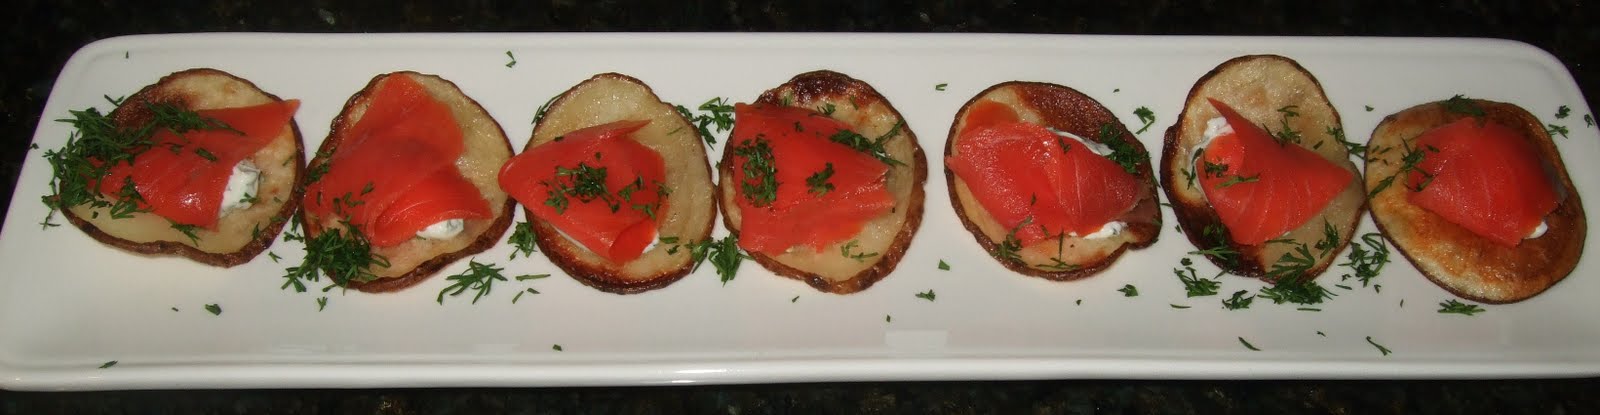
    • potato crisps with dill cream and smoked salmon

    one of the buffet tables

     
    fritattas and fruit salad

      Here is the recipe for the most popular item of the day:

      Potato Crisps with Dill Cream and Smoked Salmon 
      Makes about 40 hors d'oeuvres
      • 2 baking potatoes, skin on, scrubbed and cleaned
      • 2 Tbsp. vegetable oil
      • 1 tsp. each salt and pepper
      • 1 Cup of sour cream
      • the zest of 1 lemon
      • 2 Tbsp. dill, chopped
      • 150g. package of smoked salmon, cut into strips
      1. Preheat the oven to 450 degrees

      2. Using a mandolin or a sharp knife slice the potatoes into slices about 1/4 inch thick


      3. In a large mixing bowl toss the potato slices with the oil, salt and pepper

      4. Place the potato slices on a baking sheet, lined with aluminum foil that has also been sprayed with non-stick cooking spray


      5. Place the potatoes in the oven and bake for 20 minutes until starting to brown.

      6. Meanwhile, in a small mixing bowl, mix the sour cream with the lemon zest and dill, set aside.


      7. Remove the potatoes from the oven and let cool. 
      8. Once cooled, place the potato slices on a serving platter, top each potato with a small amount of the sour cream mixture and then with a strip of smoked salmon
      9. Garnish with some more chopped dill and serve.


      * The potato crisps and the dill cream can be made the day before, and stored in the refrigerator, just make sure to bring the potatoes to room temperature before serving
      Related Posts Plugin for WordPress, Blogger...